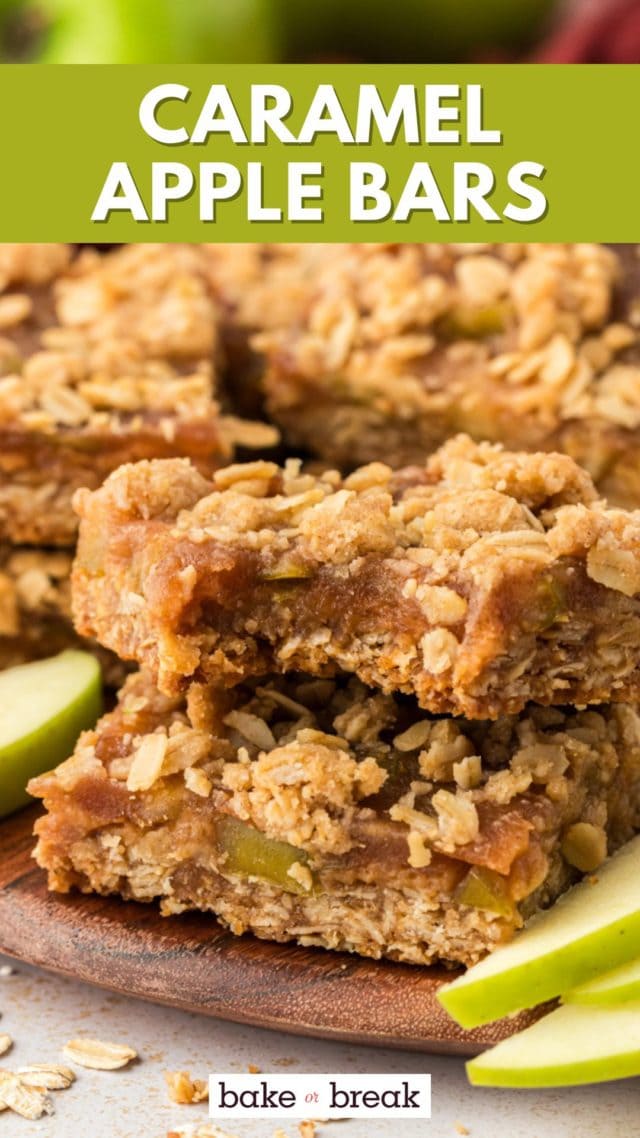
Caramel apple bars take a classic fall treat and transform them into a convenient dessert bar! With a buttery crust, gooey caramel, and tender cinnamon-spiced apples, this recipe is sure to be a hit.

One of the best things about fall baking is apples. From Apple Crumb Sheet Cake to Apple Pecan Cobbler to Classic Apple Pie to just about anything else you can come up with, I am there with a fork and ready for my serving. Well, unless I’m making these caramel apple bars—here, there’s no fork required!
In these handheld fall treats, apples and cinnamon get together with their good friend caramel to make your dessert extra delicious. The crust is packed with butter and oats and cinnamon. That’s topped with caramel, apples, and even more cinnamon. Then, more of that buttery crust tops them off.
For all of the fans of fall out there, these are a great way to kick off your fall baking. Let those apples, caramel, and cinnamon welcome you and your taste buds into cooler weather.

Why You’ll Love This Caramel Apple Bar Recipe
Here’s what makes these caramel apple bars irresistible:
- Chewy and sticky—but not messy. The caramel is nicely contained between layers of crust and apples, so you don’t have to worry about it oozing out the sides (although if it did, that wouldn’t be a bad thing!).
- The perfect balance. You get just the right amount of buttery oat crust, gooey caramel, and tender apples in every bite. (Can’t get enough of the caramel apple combo? Try my Caramel Apple Cheesecake Bars and Caramel Apple Mini Pies!)
- Cozy fall flavor. With warm cinnamon and sweet apples, these bars are the ideal treat for a chilly autumn day.
- Great for a crowd. This recipe makes a whole pan of bars, so you can share with friends and family—or keep them all to yourself, there’s no judgment here!

What You’ll Need
Scroll down to the recipe card to find the ingredient quantities and recipe instructions.
Crust:
- Old-fashioned rolled oats – Learn more: Rolled Oats vs Quick Oats
- All-purpose flour – Here’s how to measure all-purpose flour.
- Light brown sugar – Light brown sugar has a milder flavor than dark brown. Read more here: Light Brown Sugar vs Dark Brown Sugar: What’s the Difference?
- Ground cinnamon
- Baking powder
- Salt
- Unsalted butter – Chilled and cut into small pieces.
Caramel:
- Soft caramels – The chewy kind you use for making caramel apples, not the hard candies.
- Heavy cream – You’ll need full-fat heavy cream here—you can’t get away with half-and-half or milk.
Apple Filling:
- Tart apples – Granny Smith, Pink Lady, or Fuji all work well.
- Lemon juice – Here’s how to juice a lemon.
- Unsalted butter – Using unsalted butter gives you more control over the flavor of the filling. Learn more: Unsalted or Salted Butter: Which is Better for Baking?
- Granulated sugar
- Ground cinnamon
What Type of Cinnamon Is Best for Baking?
It depends on your tastes! For a light, mellow cinnamon flavor, use Ceylon cinnamon. Cassia cinnamon offers a stronger cinnamon flavor. If you want the strongest, sweetest cinnamon flavor, I recommend using Vietnamese cinnamon (also known as Saigon cinnamon).
How to Make Caramel Apple Bars
If you want to get a head start on this recipe, you can cook the apple filling a day or two in advance. Store it in the refrigerator until you’re ready to assemble and bake the bars.


- Prepare. Preheat your oven to 350°F and grease a baking pan.
- Make the crust mixture. Stir the oats, flour, brown sugar, cinnamon, baking powder, and salt in a large bowl, then work in the cold butter with a pastry blender, fork, or your fingers until the mixture is crumbly.


- Form the bottom crust. Reserve about 1/2 cup of the crust mixture. Press the rest into the bottom of the prepared pan.
- Bake. Place the pan in the oven and bake for 16 to 18 minutes, or until the crust is lightly golden. Set the pan on a wire rack to cool.


- Make the caramel. Cook the caramels and cream in a saucepan set over medium-low heat, stirring constantly, until the mixture is smooth. Pour the mixture over the crust.
- Prep the apples. Chop the apples and place them in a bowl with lemon juice, tossing them until they’re well-coated.


- Cook the apples. Melt the butter in a pan set over medium heat, then add the apples and cook for about 8 minutes. Add the sugar and cinnamon and cook about 8 minutes more, or until softened.
- Finish assembling. Spread the apple mixture evenly over the caramel layer, then scatter the reserved crust mixture over the top.

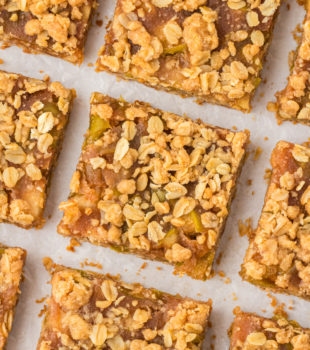
- Bake. Place the pan in the oven and bake for 25 to 30 minutes, or until the topping is lightly browned. Cool completely in the pan, then cut into bars.
Tips for Success
Read over my baking tips for beginners, then follow these additional pointers for perfect caramel apple bars:
- Line the pan for easy removal. If you’re just making these bars for yourself, you can simply grease the pan. For easier removal and neater squares, line the pan with parchment paper, then grease the paper and any exposed parts of the inside of the pan. When the bars are done baking, you can lift the parchment paper and transfer the bars to a cutting board.
- Use the best apples you can find. You can’t transform a bland, mealy apple into a delicious dessert! If it doesn’t taste good out of hand, it won’t taste good in your caramel apple bars.
- Cool completely before cutting. If you try to cut into the bars while they’re still warm, the caramel will be too soft and ooze out everywhere.

Variations
There are so many ways to customize these caramel apple bars to your liking. Here are a few ideas:
- Add chopped nuts. Pecans, walnuts, and almonds would all be delicious in these bars.
- Swap out the apples. Use half apples, half pears for a slight twist on the original recipe. Just be sure to choose firm pears—Asian pears are great!
- Add some more spice. Nutmeg or ginger would pair well with the cinnamon and caramel flavors. You could also use apple pie spice or my fall spice blend.
- Make them gluten-free. Use a gluten-free flour blend in place of all-purpose flour to make these bars gluten-free.
- Add even more caramel. Dress up these bars with a drizzle of caramel sauce before serving.

How to Store
These caramel apple bars can be stored in an airtight container at room temperature for up to 3 days, or in the refrigerator for up to 5 days. They may be slightly softer when stored in the fridge, but they will still taste delicious.
Can I Freeze This Recipe?
Yes, you can freeze these caramel apple bars for up to 2 months. Allow them to cool completely before freezing in an airtight container or zip-top freezer bag. Thaw in the refrigerator before serving.

More Apple Recipes
Caramel Apple Bars
Ingredients
For the crust:
- 2 ½ cups (248 g) old-fashioned rolled oats
- 1 cup (120 g) all-purpose flour
- 1 cup (200 g) firmly packed light brown sugar
- 1 teaspoon ground cinnamon
- ½ teaspoon baking powder
- ½ teaspoon salt
- ¾ cup (170 g) cold unsalted butter, cut into small pieces
For the caramel:
- 6 ounces (170 g) soft caramels, 18-20 caramels
- ¼ cup (60 ml) heavy cream
For the apple filling:
- 3 large tart apples, such as Granny Smith, Pink Lady, or Fuji
- 2 tablespoons (30 ml) lemon juice
- 2 tablespoons (28 g) unsalted butter
- ½ cup (100 g) granulated sugar
- 1 ½ teaspoons ground cinnamon
Recommended Products
Instructions
- Preheat oven to 350°F (175°C).
- Grease a 9”x 13”x 2” baking pan, or line with parchment paper and then grease the paper and any exposed parts of the inside of the pan.
To make the crust:
- Stir together the oats, flour, brown sugar, cinnamon, baking powder, and salt in a large bowl. Add the cold butter and mix with a pastry blender, a fork, or your fingers until the mixture is crumbly.
- Set aside about 1/2 cup of the crust mixture.
- Press the remaining dough evenly into the bottom of the prepared pan. Bake 16-18 minutes, or until the crust is lightly golden. Set the pan on a wire rack to cool slightly.
To make the caramel layer:
- Place the caramels and cream in a heavy saucepan. Cook over medium-low heat, stirring constantly, until the mixture is smooth.
- Immediately pour the caramel over the partially baked crust and spread evenly.
To make the apple filling:
- Chop the apples into small pieces (1/4-1/2-inch). As you chop the apples, place them in a medium bowl and toss with lemon juice to prevent browning. (You'll have roughly 3 cups of chopped apples.)
- Place the butter in a large pan over medium heat. When the butter has melted, add the chopped apples. Cook about 8 minutes, stirring frequently. Add the sugar and cinnamon, and continue cooking another 8 minutes, or until apples are softened.
- Spread the apple mixture evenly over the caramel layer. Scatter the reserved crust mixture over the top of the apple filling.
- Bake 25-30 minutes, or until the bars are lightly browned. Cool completely in the pan before cutting into bars.
Notes
- Store in an airtight container at room temperature up to 3 days or in the refrigerator up to 5 days.


8 Comments on “Caramel Apple Bars”
these sound absolutely perfect!
Thank you for this recipe! Question for you, the oats, should we be using the quick 1 min cooking oats, or the old fashioned (longer cooking time) oats?
Chandana, I used old-fashioned oats.
Yum!! I am so in the mood for anything “apple” now that fall is here!
Thank you Jennifer!
Yum!! Perfect for fall!
Do you drain the apples after you cook them? I had quite a bit of liquid after cooking. To be safe I drained some, and they turned out great but I was wondering if you had the same results. Great recipe! I’m definitely keeping this one in my archive.
Jenni, I didn’t drain the apples, but it’s perfectly fine to drain some of the liquid if you want. If memory serves, I didn’t have an abundance of liquid after cooking them.