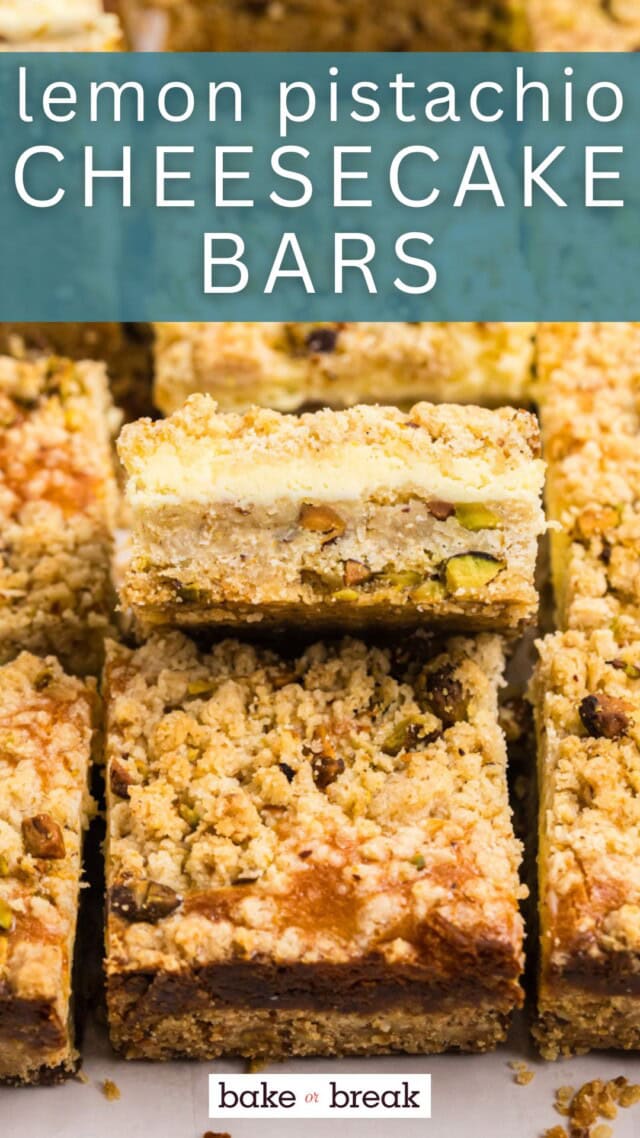
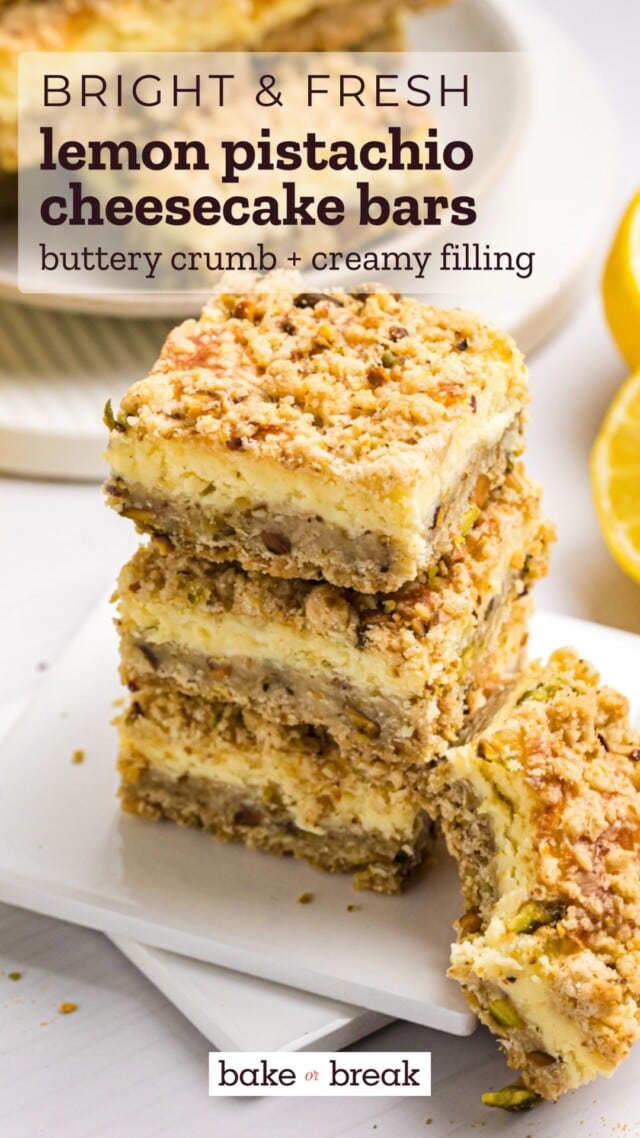
These lemon pistachio cheesecake bars are a little bit of everything I love in a dessert — bright citrus, creamy cheesecake, and a buttery crumb packed with pistachios.

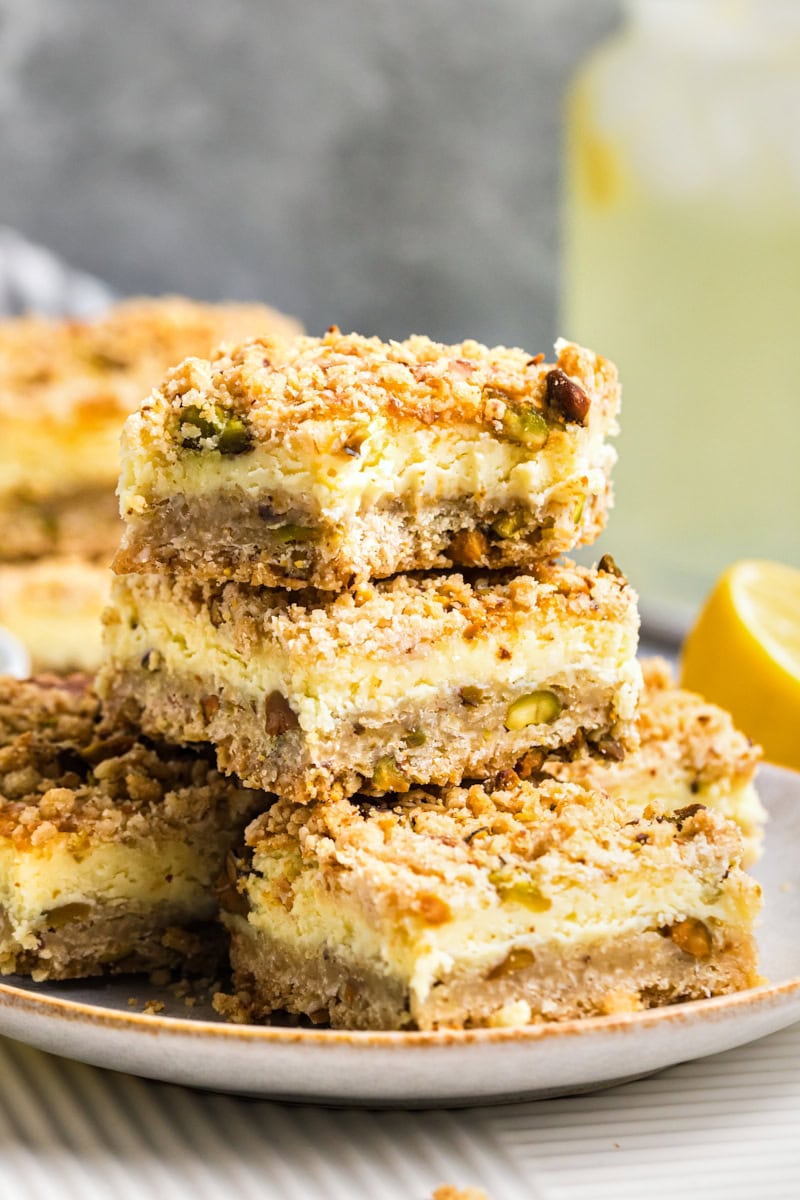
If you’re in the mood for something a little different from the usual lemon bars, these lemon pistachio cheesecake bars are such a fun change of pace. They’ve got a soft, creamy cheesecake layer with plenty of lemon flavor, tucked between a buttery oat crust and a crumbly pistachio topping.
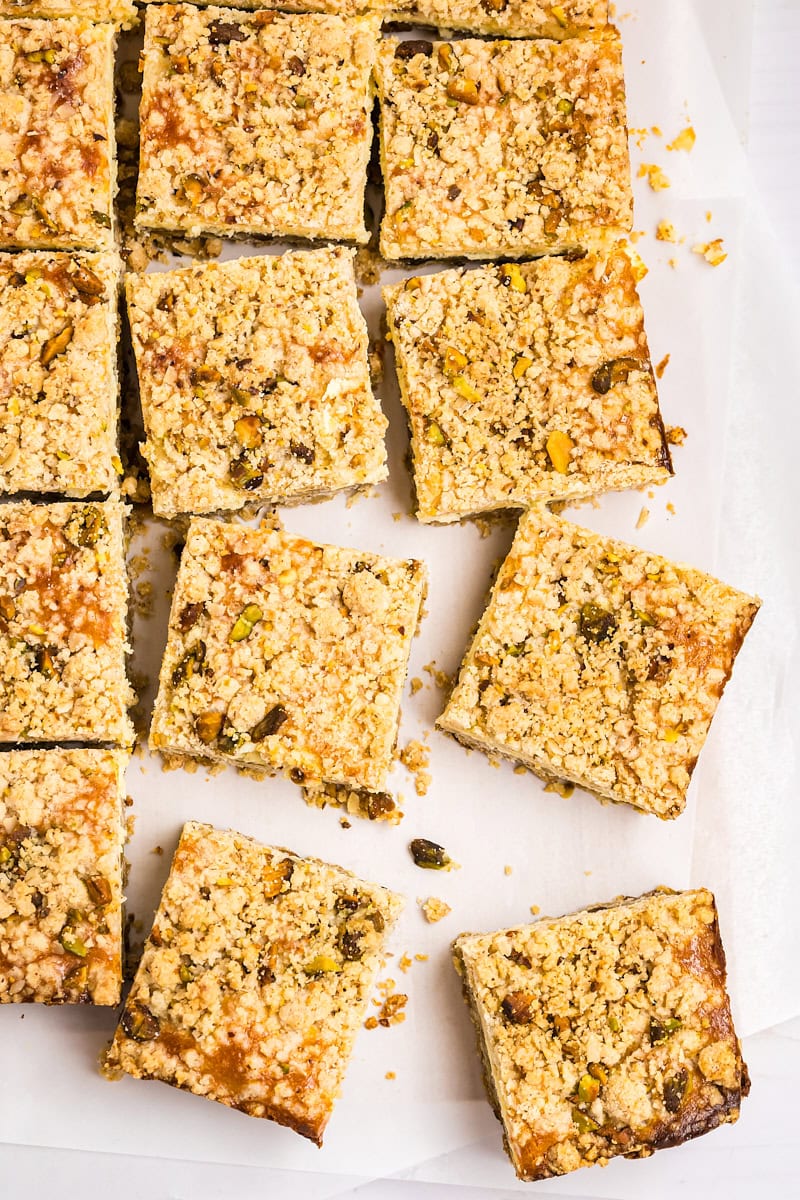
They’re not quite classic lemon bars and not quite traditional cheesecake bars, either. Instead, they land somewhere in between — a more relaxed, slice-and-share kind of dessert with a mix of textures in every bite. The crumble gives them a slightly rustic feel, while the cheesecake layer keeps things rich and smooth.
And while they might look a little fancy, they’re actually very simple to make. It’s an easy press-in crust, a quick filling, and a sprinkle of crumb topping to finish things off. After a chill in the refrigerator, they slice beautifully and are ready to serve.
Why You’ll Love These Lemon Pistachio Cheesecake Bars
- Not your typical lemon bars. Instead of a firm lemon curd layer, these have a soft, creamy cheesecake filling with plenty of bright lemon flavor.
- More like a crumb bar (in the best way). The buttery oat and pistachio mixture acts as both the crust and the topping, giving these a crisp, crumbly texture that sets them apart from standard cheesecake bars.
- Bright, creamy, and just a little nutty. The lemon keeps the cheesecake layer from feeling heavy, while the pistachios add a subtle richness and texture in every bite.
- Simple to make, easy to slice. No water baths or fussy steps — just press in the crust, mix the filling, and sprinkle the topping. After chilling, they cut cleanly into neat bars.
- Great for making ahead. These need time to chill anyway, so they’re perfect for prepping in advance for gatherings or just having a dessert ready to go.
Key Ingredients
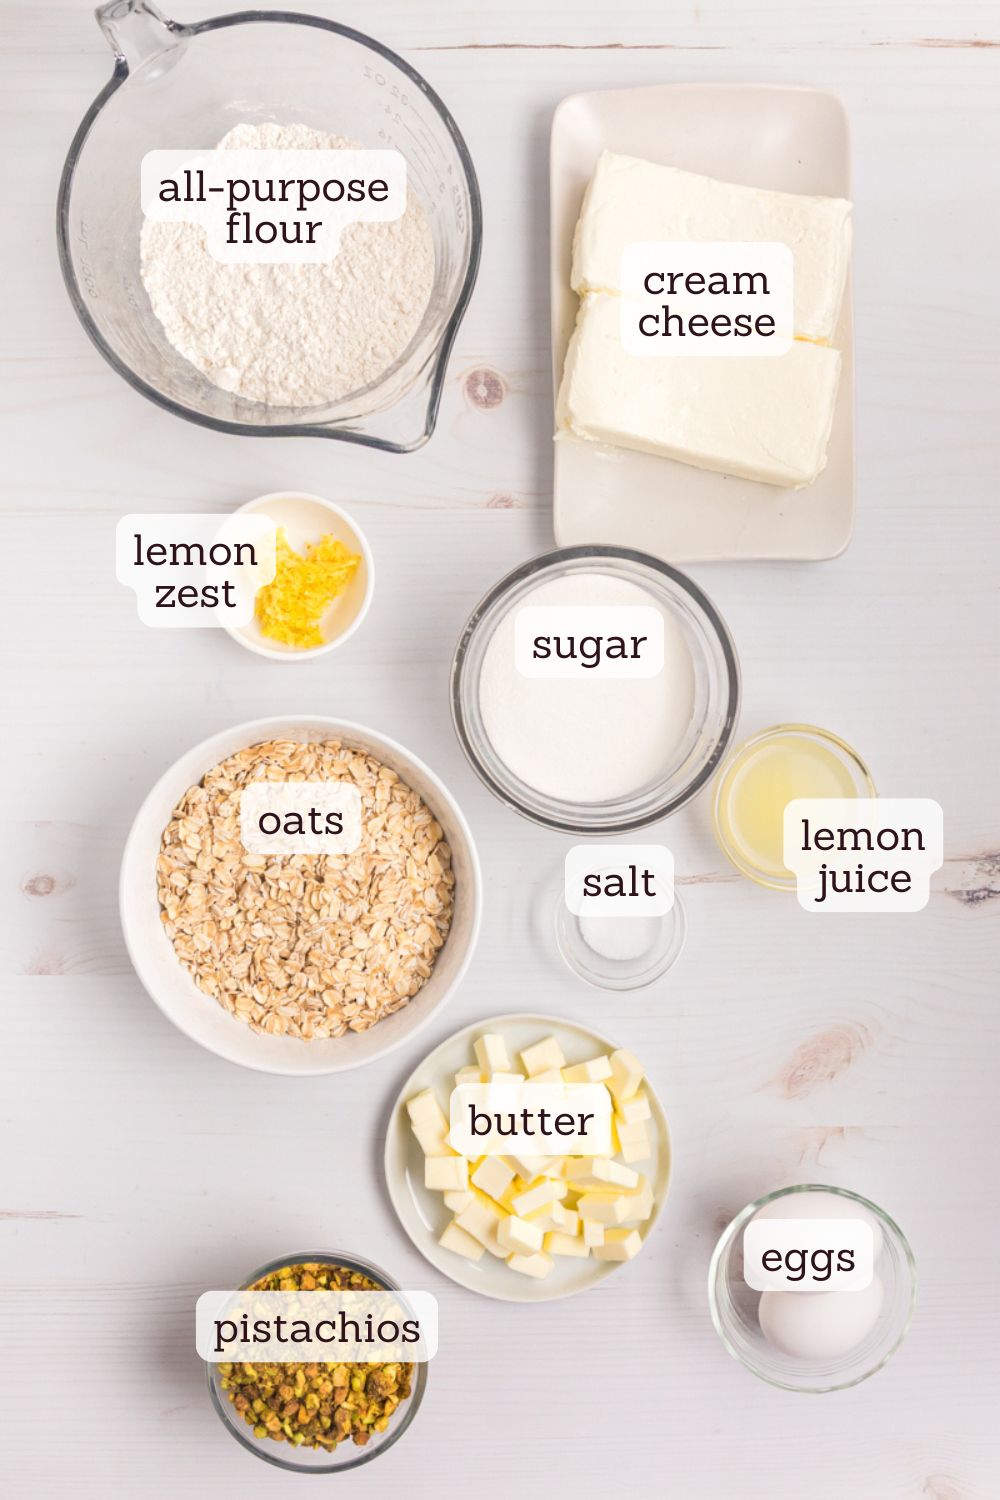
- Lemon zest and juice – You’ll use both here for the best flavor. The zest brings a bright, fragrant citrus note to the crumb, while the juice gives the cheesecake layer its tangy kick. You can adjust the juice slightly to suit your taste.
- Cream cheese – This is what gives the filling its smooth, creamy texture. Make sure it’s at room temperature so it blends easily and stays lump-free.
- Pistachios – Chopped pistachios add a subtle nutty flavor and a bit of texture to the crumb topping. Roasted pistachios work best here for the most flavor. If you’re using salted pistachios, you can either leave them as-is for a little contrast or reduce the added salt slightly.
- Old-fashioned rolled oats – These help create that buttery, crumbly texture in both the crust and topping. They’re key to giving these bars more of a crumb bar feel than a traditional cheesecake bar.
- Butter – Cold butter is what brings the crumb mixture together and helps create those crisp, golden bits on top.
How to Make Lemon Pistachio Cheesecake Bars
Make the crumb mixture.
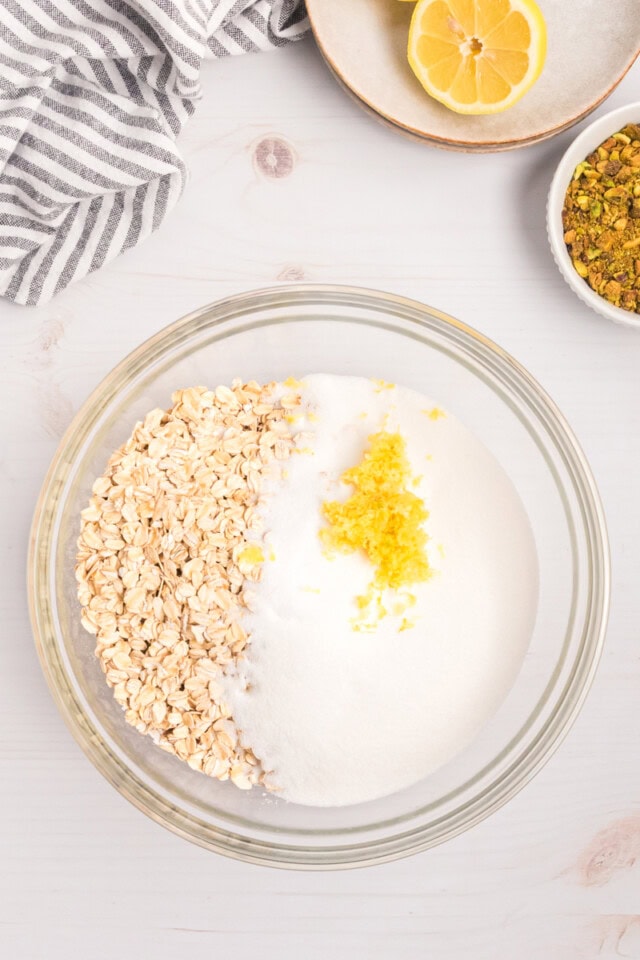
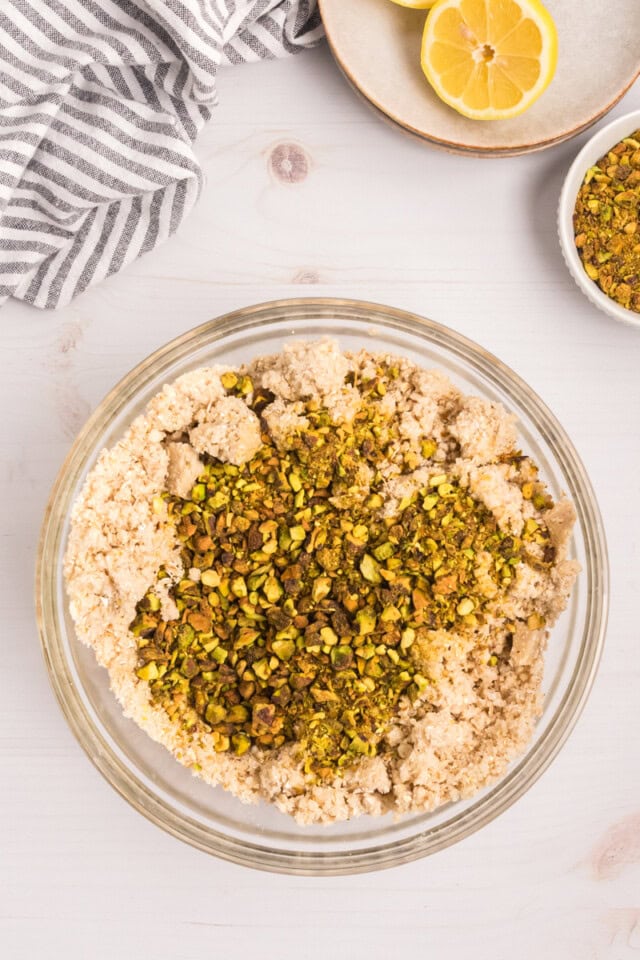
Combine the flour, oats, sugar, salt, and lemon zest, then cut in the cold butter until the mixture forms coarse crumbs that hold together when pinched. Stir in the chopped pistachios. This mixture will do double duty as both the crust and the topping.
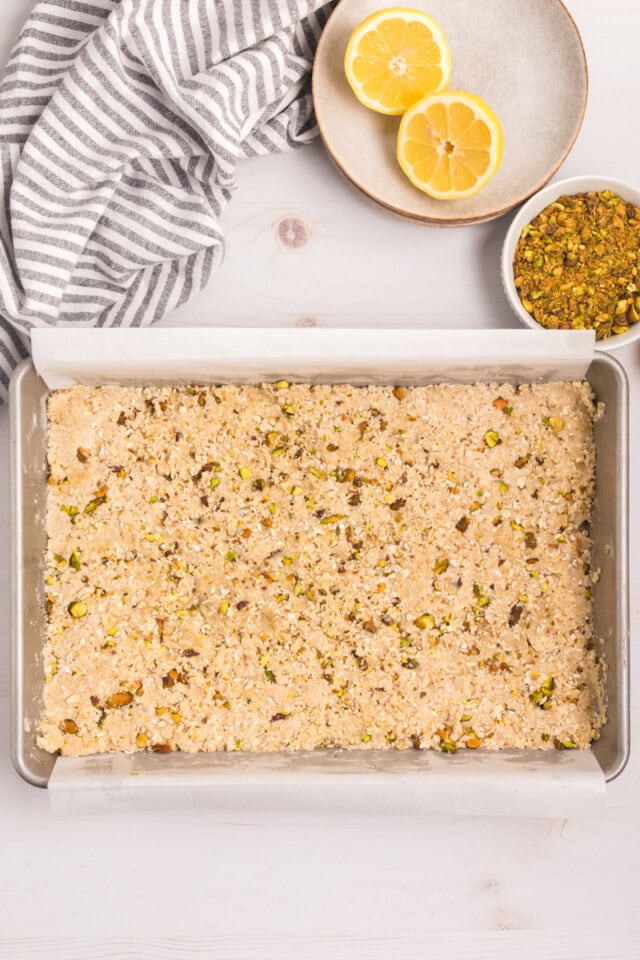
Press and pre-bake the crust.
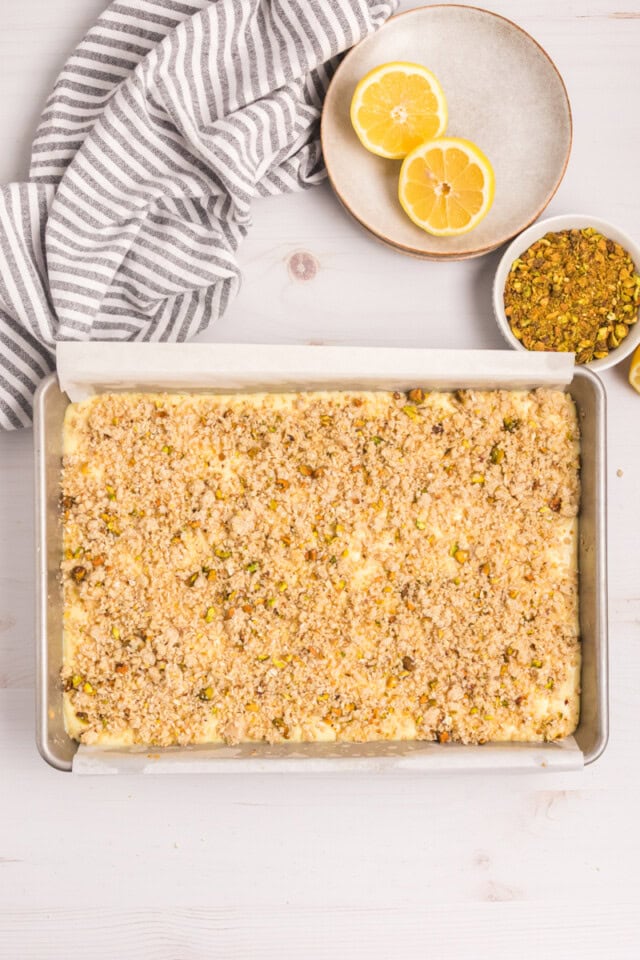
Set aside a portion of the crumb mixture, then press the rest firmly and evenly into the bottom of a greased 9×13-inch pan. Bake it briefly to give it a head start — this helps keep the base from getting too soft once the filling is added.
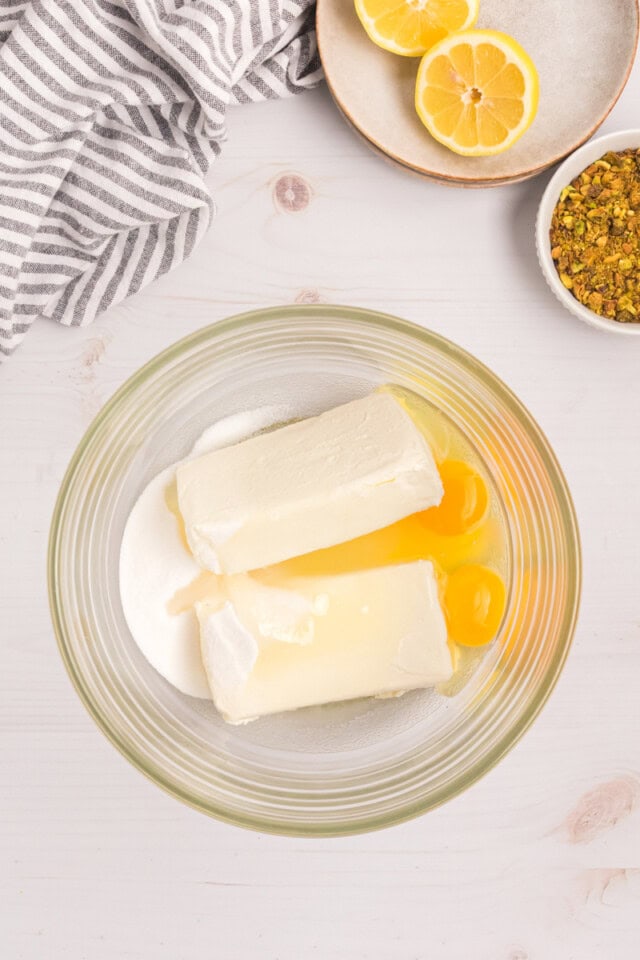
Mix the cheesecake filling.
Beat the cream cheese, sugar, eggs, and lemon juice until smooth and creamy. Keep the mixing gentle to avoid incorporating too much air, which can affect the texture.
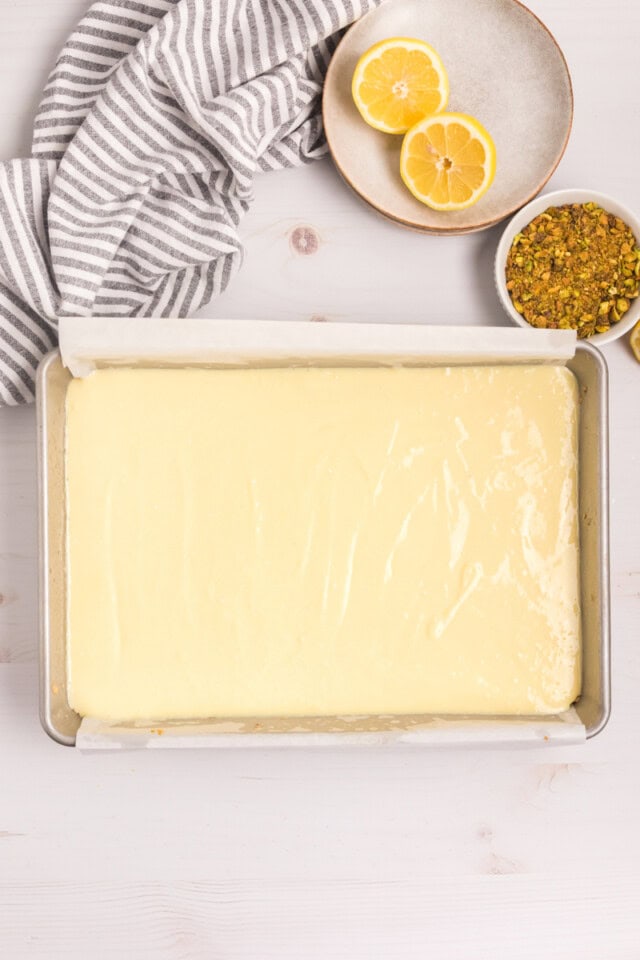
Assemble the layers.
Pour the filling over the slightly cooled crust and spread it evenly. Sprinkle the reserved crumb mixture over the top, letting some of the filling peek through for that classic crumb bar look.
Bake until just set.
Bake until the edges are lightly browned and the center looks set but still has a slight jiggle. That’s your cue that the filling will finish setting as it cools.
Cool and chill before slicing.
Let the bars cool at room temperature briefly, then refrigerate until fully chilled. This step is key for clean slices and the best texture.
Tips for Success
- Use cold butter for the crumb. Cold butter is key for getting that crumbly texture. If it’s too soft, the mixture will turn more dough-like and won’t give you those crisp, buttery bits.
- Don’t skip the pre-bake. Giving the crust a short bake before adding the filling helps it hold together and keeps it from getting soggy.
- Mix the filling just until smooth. Avoid over-mixing. Too much air can lead to a puffed filling that sinks more as it cools.
- Bake until the center is just set. The edges should be lightly golden, and the center should still have a slight jiggle. It will firm up as it cools and chills.
- Chill completely before slicing. This makes a big difference. Fully chilled bars will cut much more cleanly and have the best texture.
Variations & Serving Ideas
- Add a little extra lemon. For a brighter citrus flavor, add a bit more zest to the crumb mixture or a splash more juice to the filling. A light dusting of powdered sugar before serving is also a nice touch.
- Try a different nut. No pistachios? Chopped almonds or pecans work well here and still give you that nutty crunch in the crumb topping.
- Make them extra pretty. For serving, you can top the bars with a sprinkle of chopped pistachios or a bit of lemon zest for a simple finish.
- Serve them well chilled. These are best straight from the refrigerator when the filling is firm and creamy and the crumb is nicely set.
- Pair with something simple. They’re great on their own, but you can serve them with a dollop of whipped cream or alongside fresh berries for an easy, slightly dressed-up dessert.

How to Store
Refrigerator: Store the bars in an airtight container in the refrigerator for up to 4–5 days. They’re actually best served chilled, when the filling is firm and creamy.
Freezer: You can freeze these bars for longer storage. Once fully chilled, cut into squares and place them in a single layer to freeze, then transfer to an airtight container or freezer bag. They’ll keep well for up to 2 months. Thaw overnight in the refrigerator before serving.
A Bright and Buttery Twist on Cheesecake Bars
These lemon pistachio cheesecake bars are one of those desserts that feel a little different in the best way. They’ve got the creamy richness of cheesecake, the brightness of lemon, and that buttery crumb texture that makes them easy to slice and share.
They’re just as at home on a spring dessert table as they are as a make-ahead treat to keep in the refrigerator for the week. And once you’ve had that combination of lemon and pistachio, it’s hard not to come back to it again.
If you enjoy this kind of easy, slice-and-share dessert, you might also like my Key lime pie bars, lemon pound cake bars, and blueberry pie bars — all great options when you want something simple but a little special. For all of you lemon lovers, be sure to see my collection of lemon desserts.
More Cheesecake Bar Recipes

Lemon Pistachio Cheesecake Bars
Ingredients
For the crust and crumb topping:
- 2 cups (240 g) all-purpose flour
- 1 ½ cups (148 g) old-fashioned rolled oats
- 1 cup (200 g) granulated sugar
- ½ teaspoon salt
- zest of 1 medium lemon
- 1 cup (226 g) unsalted butter, cold and cut into 1/2-inch cubes
- 1 cup (120 g) chopped pistachios
For the filling:
- 16 ounces (454 g) cream cheese, at room temperature
- ¾ cup (150 g) granulated sugar
- 2 large eggs
- juice of 1 or 2 medium lemons, 2 to 4 tablespoons (30 to 60ml)
Recommended Products
Instructions
To make the crust and crumb topping:
- Preheat oven to 350°F (175°C). Grease a 9"x 13"x 2" baking pan and line with parchment paper to create a sling.
- Combine the flour, oats, sugar, salt, and lemon zest. Add the butter, and mix with a pastry blender, a fork, or your fingers until the mixture is thoroughly combined. The mixture should form crumbs and hold together when pinched.
- Mix in the pistachios.
- Reserve about 1 cup of the mixture for the crumb topping.
- Transfer the remaining mixture to the prepared pan. Press firmly into an even layer in the bottom of the pan.
- Bake 15 minutes. Set aside to cool slightly.
To make the filling:
- Using an electric mixer on medium speed, beat the cream cheese, sugar, eggs, and lemon juice. Mix just until smooth and combined.
- Pour the filling over the partially baked crust, and spread evenly.
- Sprinkle the reserved crumb topping over the top of the filling.
- Bake 40 to 45 minutes. The edges should be lightly browned and the center just set (it may still have a slight jiggle).
- Cool in the pan on a wire rack for about 20 minutes. Then cover and refrigerate until fully chilled and set (at least 2 hours) before serving.
- For clean slices, chill thoroughly and cut with a sharp knife, wiping between cuts.
Video
Notes
- Lemon flavor: Adjust the amount of lemon juice to suit your taste. For a more pronounced lemon flavor, use the full amount and don’t skip the zest.
- Pistachios: Roasted pistachios will give you the best flavor. If using salted pistachios, you may want to slightly reduce the added salt in the crumb mixture.
- Doneness: The center should still have a slight jiggle when you remove the bars from the oven. They will continue to set as they cool and chill.
- Slicing: For clean slices, chill the bars thoroughly and use a sharp knife, wiping it clean between cuts if needed.
- Storage: Keep tightly covered in the refrigerator for 4-5 days.


6 Comments on “Lemon Pistachio Cheesecake Bars”
Those will be made this weekend! I mean come on…pistachios, lemons and cheesecake! Perfection!
it looks so good!
Made this today as an “experiment” for Christmas. The thought of lemons and pistachios together sounded divine. I followed the recipe and baked each section as directed. It turned out dense and dry. I thought there was too much crust as well. Any suggestions for a do – over are welcomed.
Hi, Roz. For it to be dry, I can only think that maybe there was too much flour in the crust layer. I recommend either the spoon and sweep method or weight measurement for flour. (See How to Measure Flour). As you can see in the photos, these bars should be about half crust and half cheesecake. If you want less crust, then you can scale the recipe if you like.
These turned out great for me! Thanks for the recipe. I used 1 lemon and a half because I couldn’t decide and fewer pistachios because I got lazy deshelling them (next time I’ll be adding 100g though). For the base I used a mixer, which made the mixture very dough like rather than the crumbly texture you describe. It turned out okay though, and I simply added more flour to the top portion until i got the crumbly effect.
I’m glad you liked them, Lauren!