
Homemade pie crust doesn’t have to be daunting! This pie crust recipe is made with just a few ingredients and few simple steps. You’ll be ready to say goodbye to store-bought crusts!
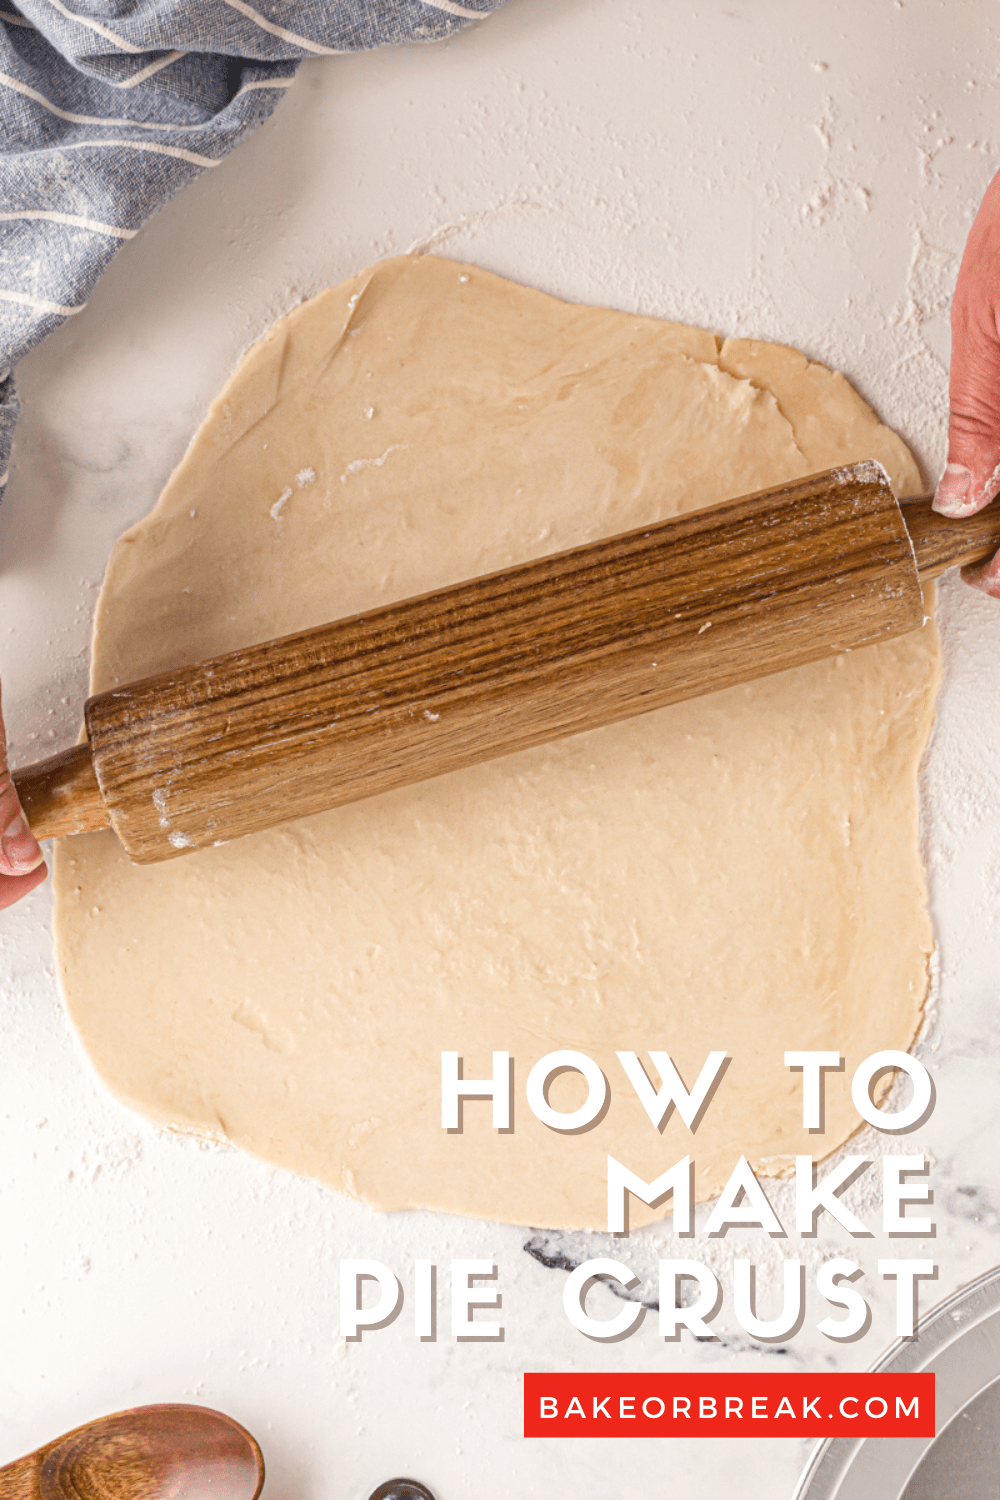
Table of contents
Homemade Pie Crust Recipe
Pie crust eluded me for years. I could never quite get it right, no matter which method I used. The key was taking a more scientific approach and researching what works and what doesn’t for other bakers.
After some trial and error and an extra giant boost of patience, I landed on my go-to pie crust recipe. (Cue the cheers!!!) I know if I can do it, so can you! After you’ve found success, you’ll have lovely, delicious pie crusts and never have to go the store-bought route again.
What Makes a Good Pie Crust?
That’s a bit of a loaded question, as we won’t likely all agree on what makes a perfect pie crust. In my book, a crust should be flaky and buttery.
Just how flaky your crust is will depend on your ingredients and your mixing method. And butteriness is a result of (you guessed it!) using butter in your crust.
All-Butter Pie Crust
I prefer to make pie crusts with butter as the fat component. You’ll see some pie crust recipes that use shortening or a combination of butter and shortening. While shortening is often lauded for making very flaky crusts, butter will do that as well if you don’t over-work the dough. If you prefer to use shortening in this pie crust, try substituting half of the butter with shortening.
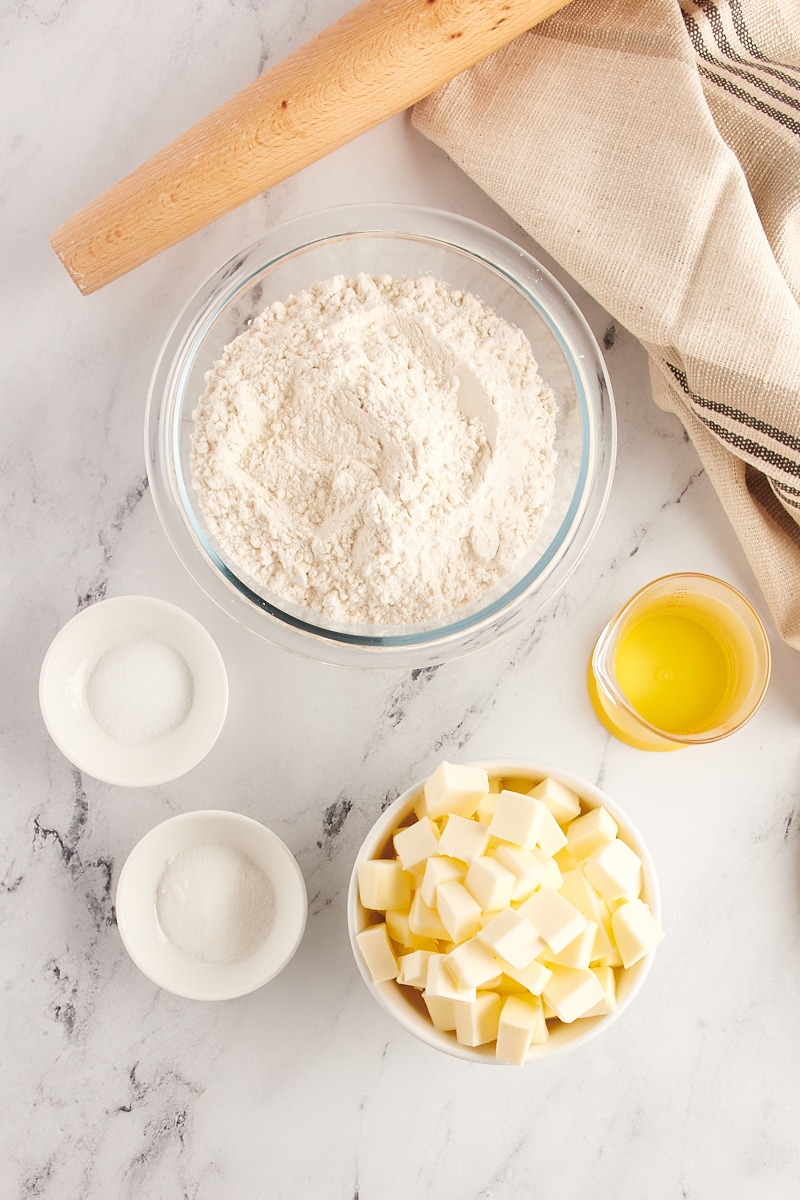
Pie Crust Ingredients
This short list of ingredients is all you need to make homemade pie crust. See the recipe card at the bottom of this post for ingredient quantities and full instructions. Here are some helpful notes about the ingredients you’ll need.
- All-purpose flour – Be sure to measure accurately. I recommend weighing the flour for the best accuracy, but you can simulate that by spooning and sweeping. Learn more: How to Measure Flour
- Granulated sugar – I usually like a little bit of sugar in my pie crusts, but you can also omit it if you like.
- Salt
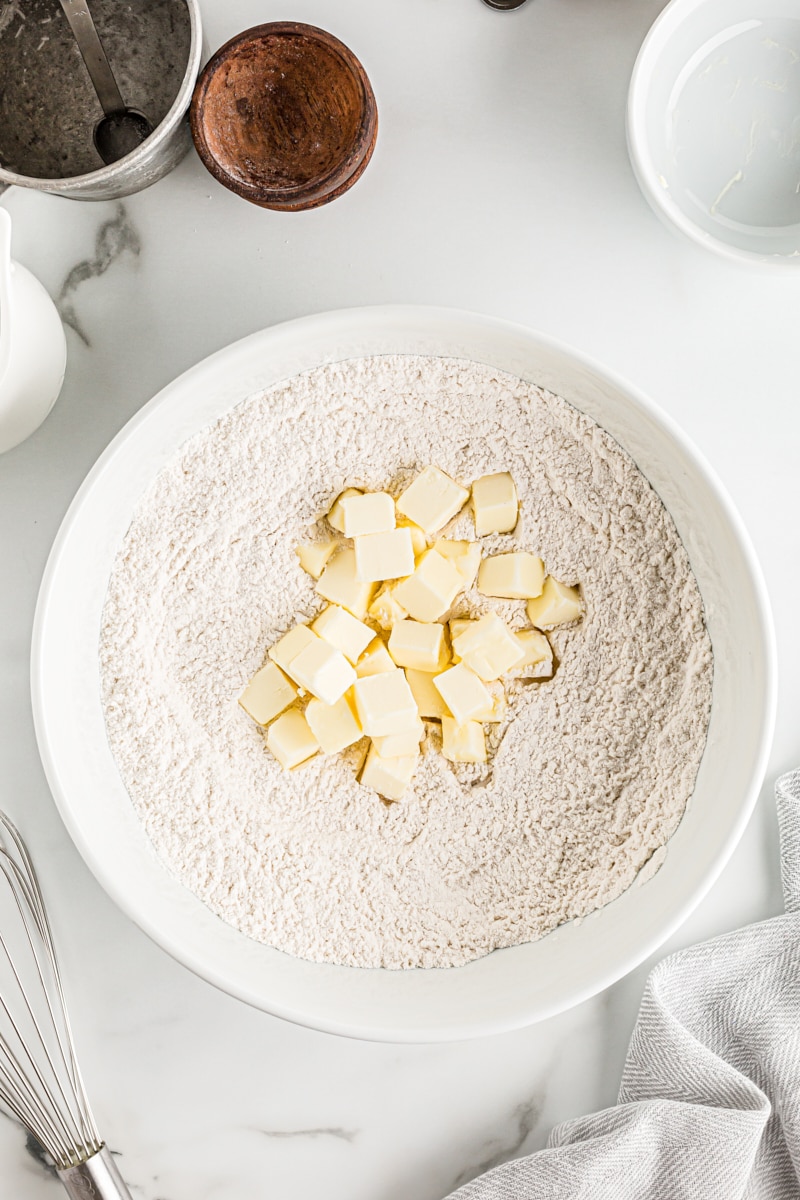
- Unsalted butter – The butter for your pie crust needs to be quite cold so it will nicely coat the flour instead of melting into it when mixing. I recommend cutting it into cubes and returning it to the refrigerator until it’s needed.
- Very cold water – Like the butter, the water needs to be cold. You can place ice cubes in the water if you want to make extra sure it stays cold.
Mixing by Hand vs Mixing with a Food Processor
This pie crust recipe can be mixed either by hand or with a food processor. Neither is necessarily a better method, so use whichever way you prefer.
Mixing by hand is a bit more effort and time. Mixing in a food processor is definitely quicker, but it’s easy to over-mix if you aren’t paying attention. Early in my pie crust days, I exclusively mixed with a pastry blender. However, I’ve come to appreciate the expediency of using a food processor and sometimes go that route.
Below, you’ll find steps for making your pie crust both ways. Use whichever method that works best for you.
How to Make Pie Crust by Hand
It’s really quite simple to make this pie crust recipe. It makes enough dough for a 9-inch double crust pie, but you can easily half it if you only need a single crust. Or see below for how to freeze pie crust for later use.
- Prepare your ingredients and tools. Measure your ingredients and make sure your butter and water are very cold.
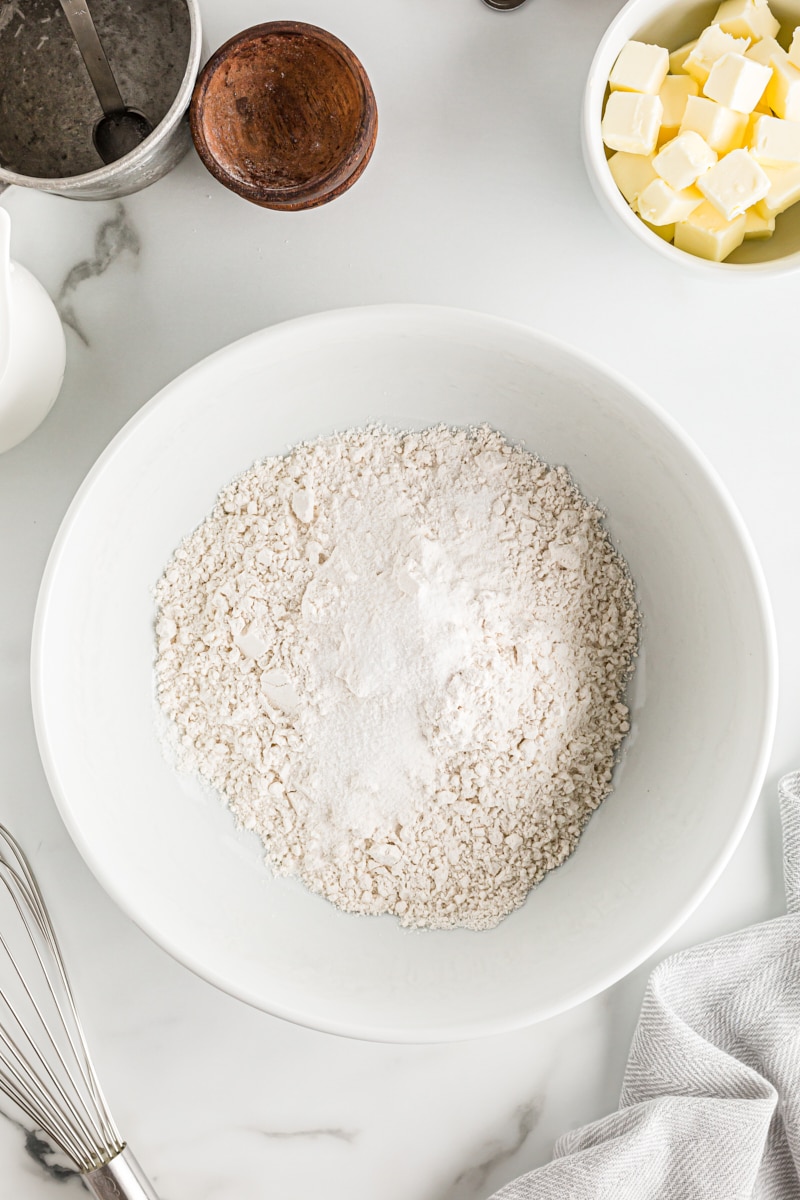
- Mix the dry ingredients. Whisk or stir together the flour, sugar, and salt.
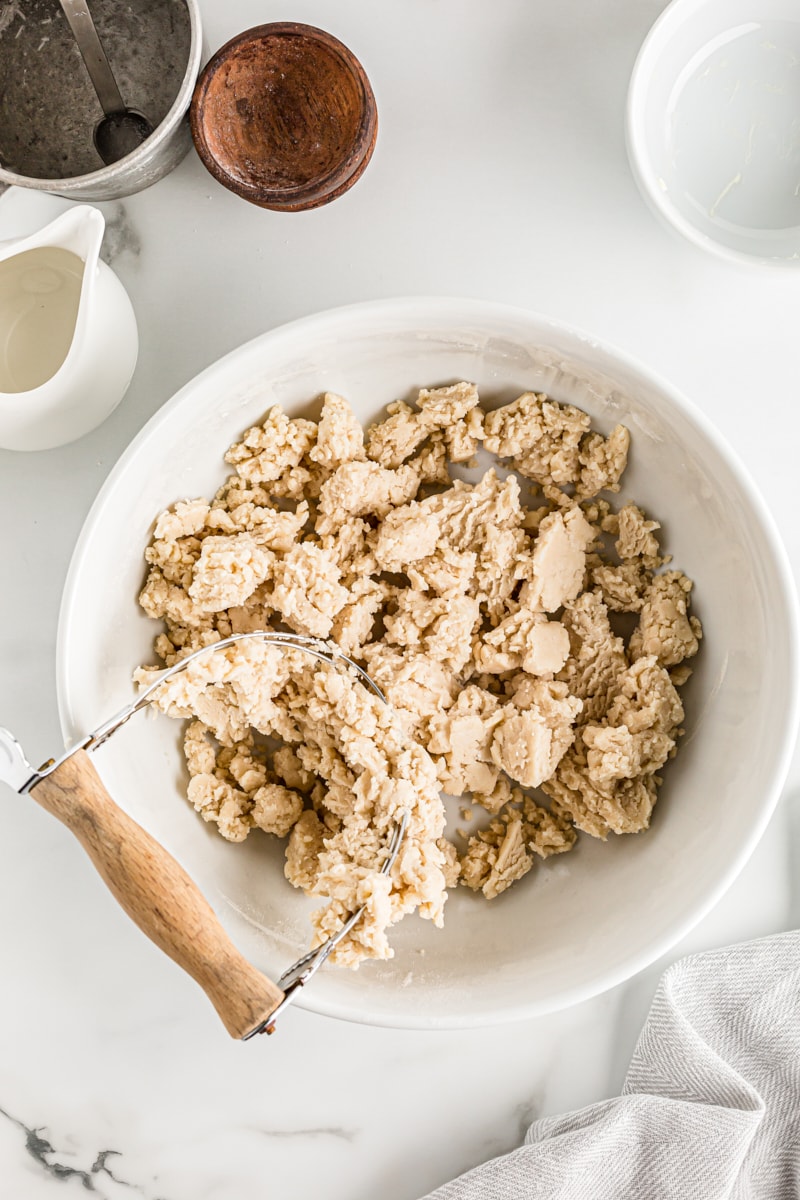
- Mix in the butter. Add the cold butter to the flour mixture, and mix with a pastry blender, a fork, or two knives. Then continue mixing until the butter is incorporated with the dry ingredients while keeping little bits of butter intact. You should see pieces of butter about the size of peas.
- Add the water. Start by drizzling about 2 tablespoons of the cold water over the dough. Then continue mixing, adding a small amount of water (about a tablespoon) at a time until the mixture comes together and forms a dough. Work quickly, and be sure not to over-mix.
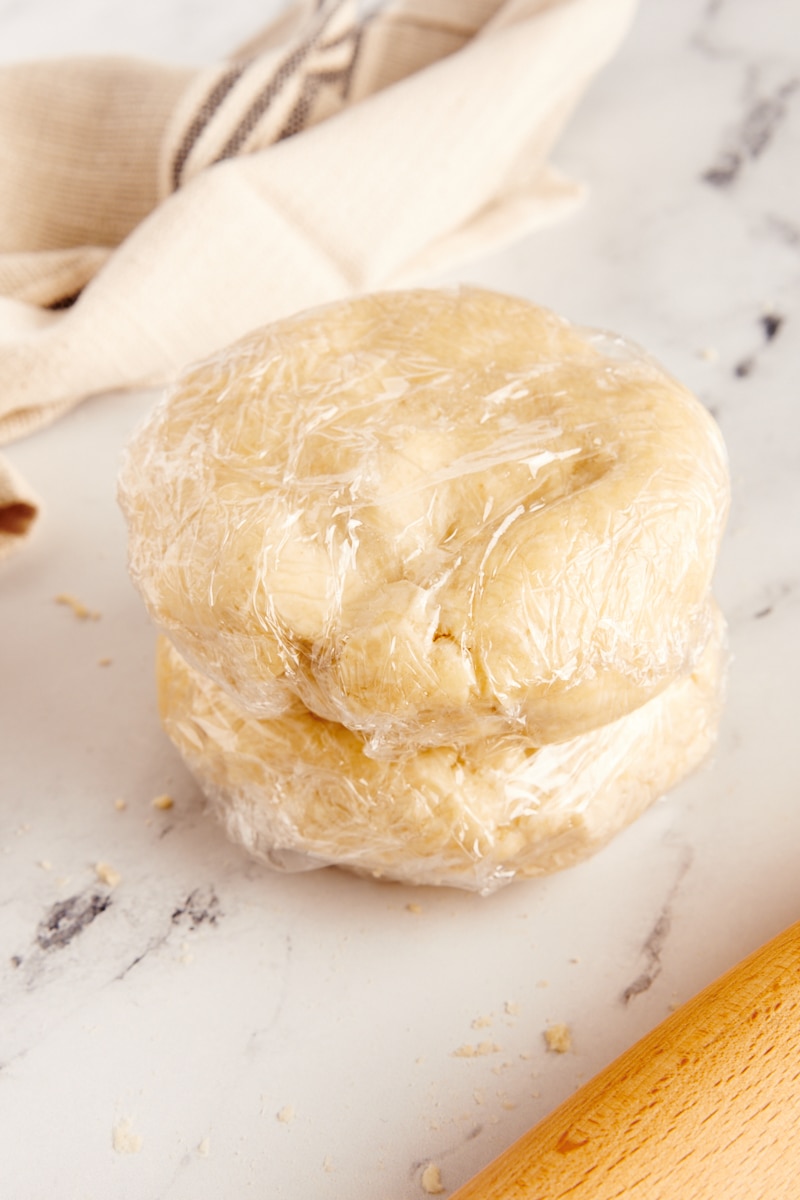
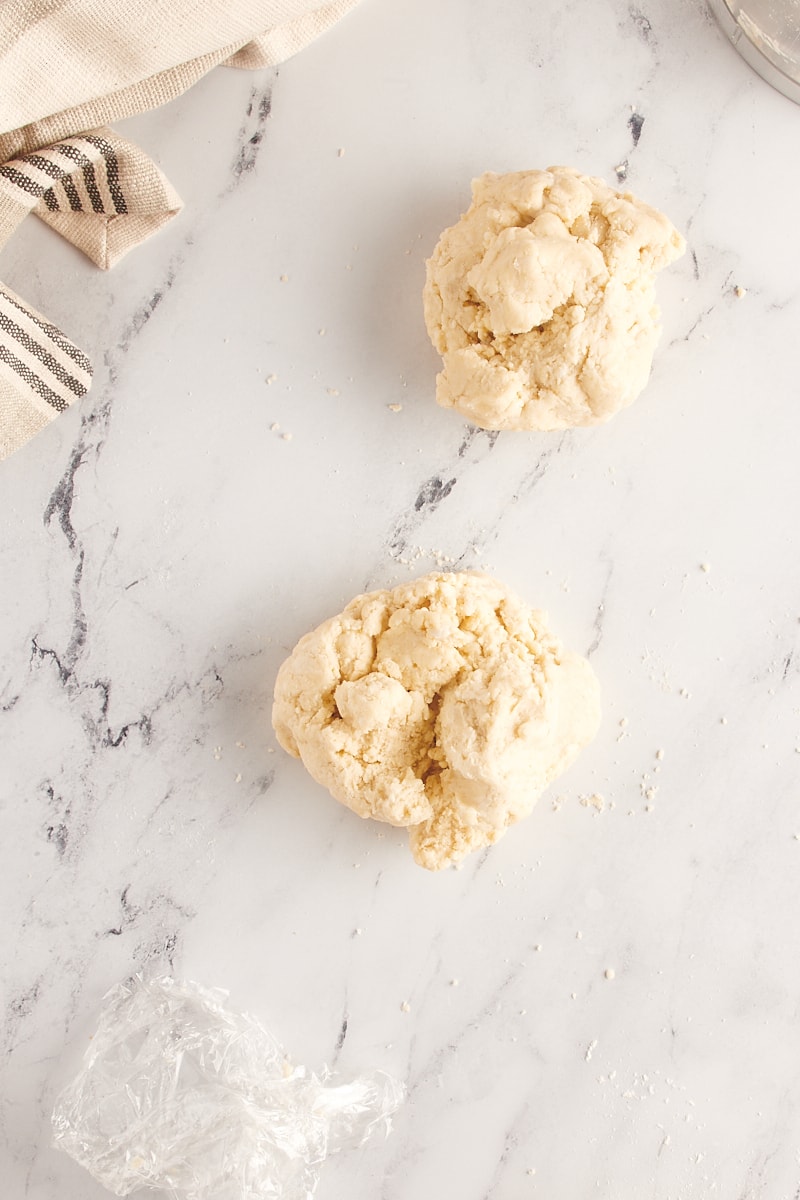
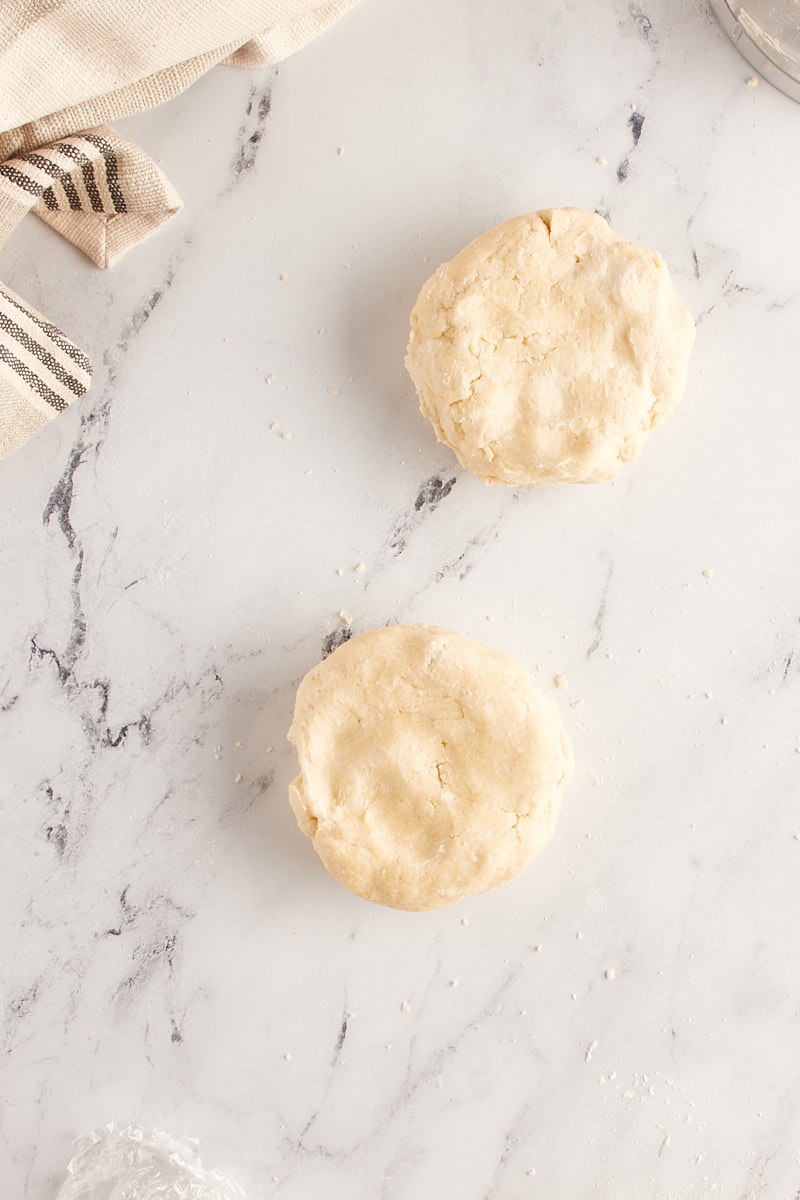
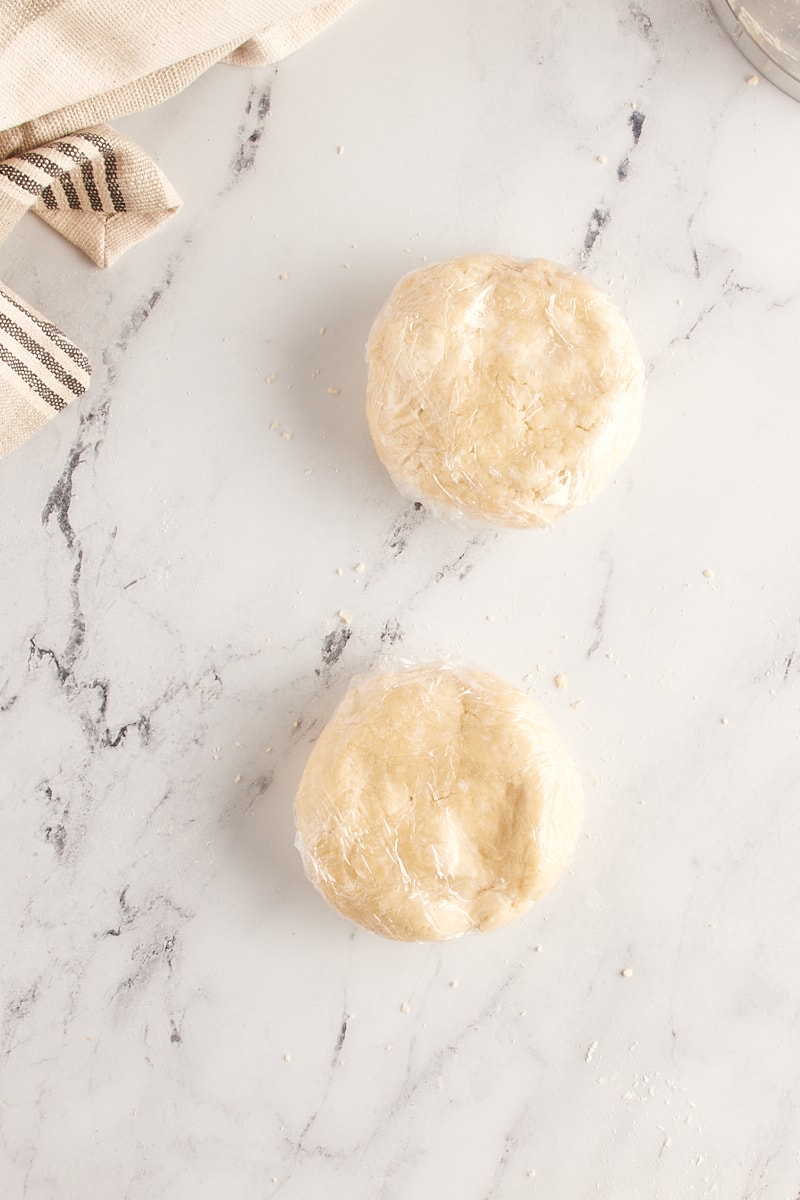
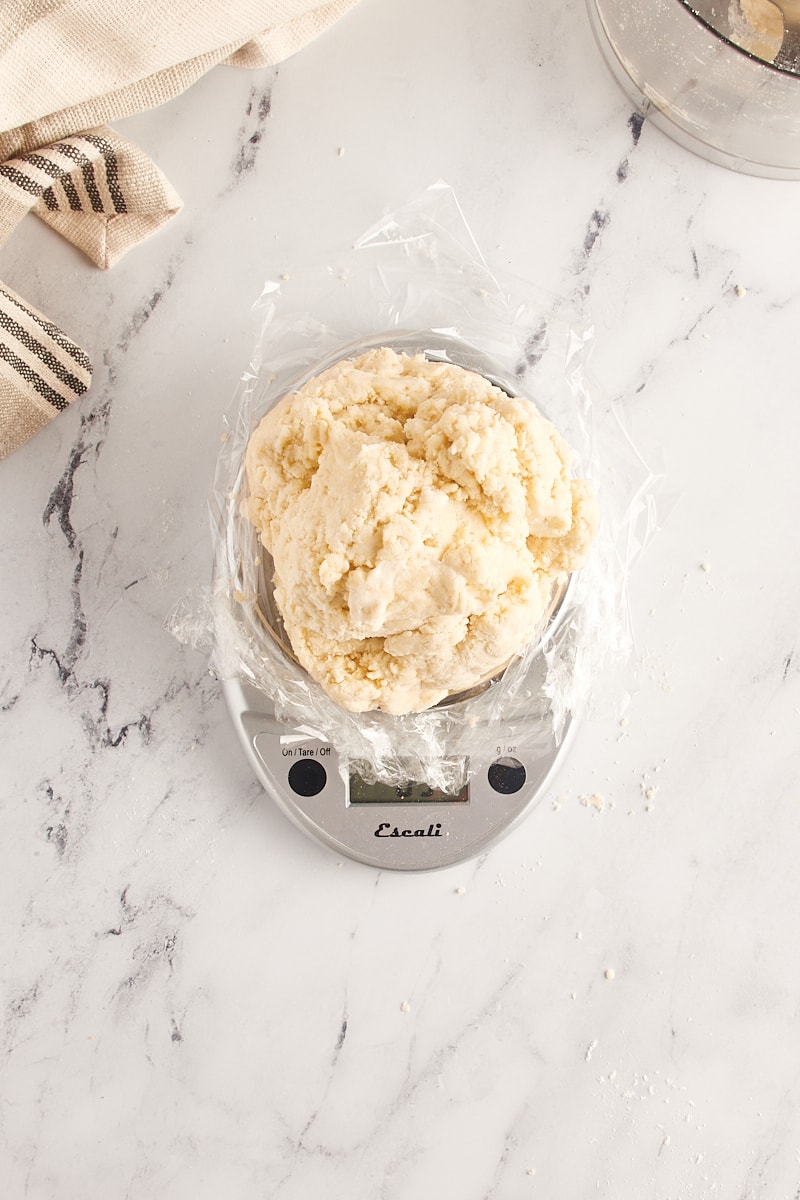
- Chill. Divide the dough in half, and flatten each half into a disc. Wrap each half in plastic wrap, and place in the refrigerator. It needs at least 2 hours in the refrigerator, but it can keep up to 5 days.
How to Make Pie Crust in a Food Processor
The method for making pie crust in a food processor is very similar to the by-hand method. Just make sure your food processor has a large enough volume (Mine has an 11-cup capacity.), and take care not to over-mix the dough.
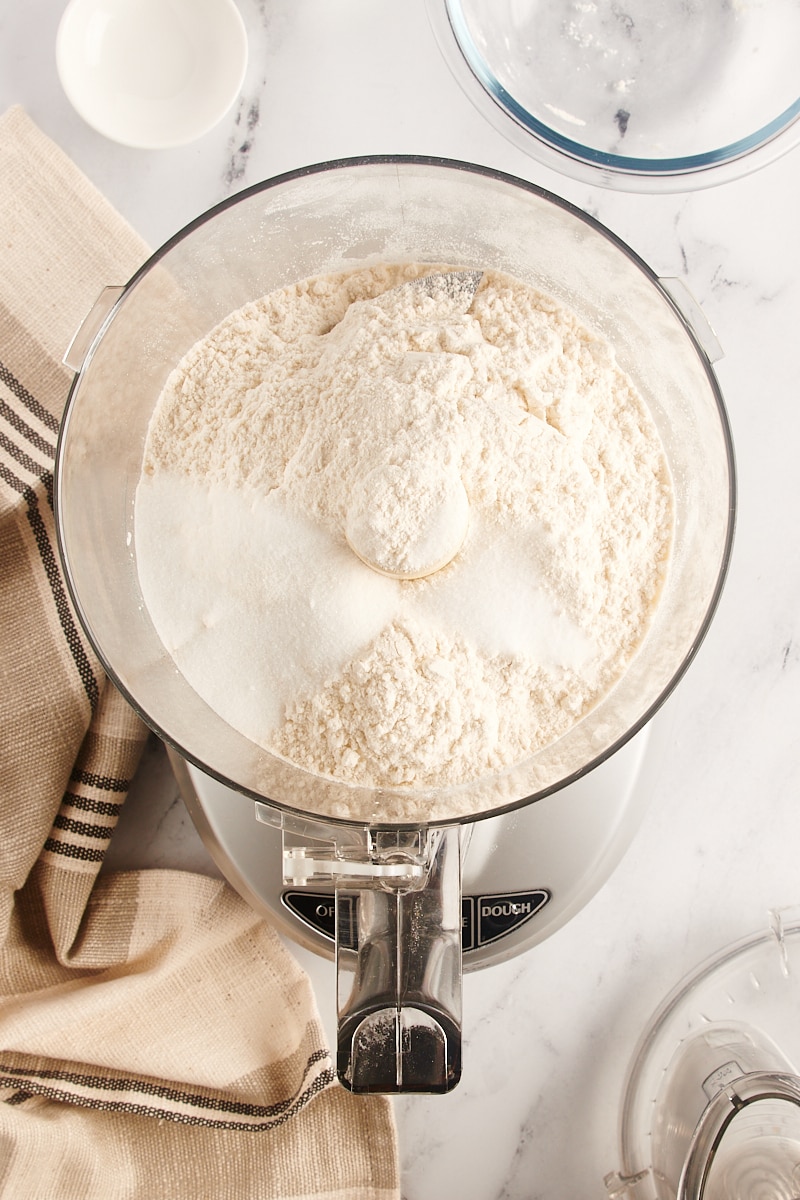
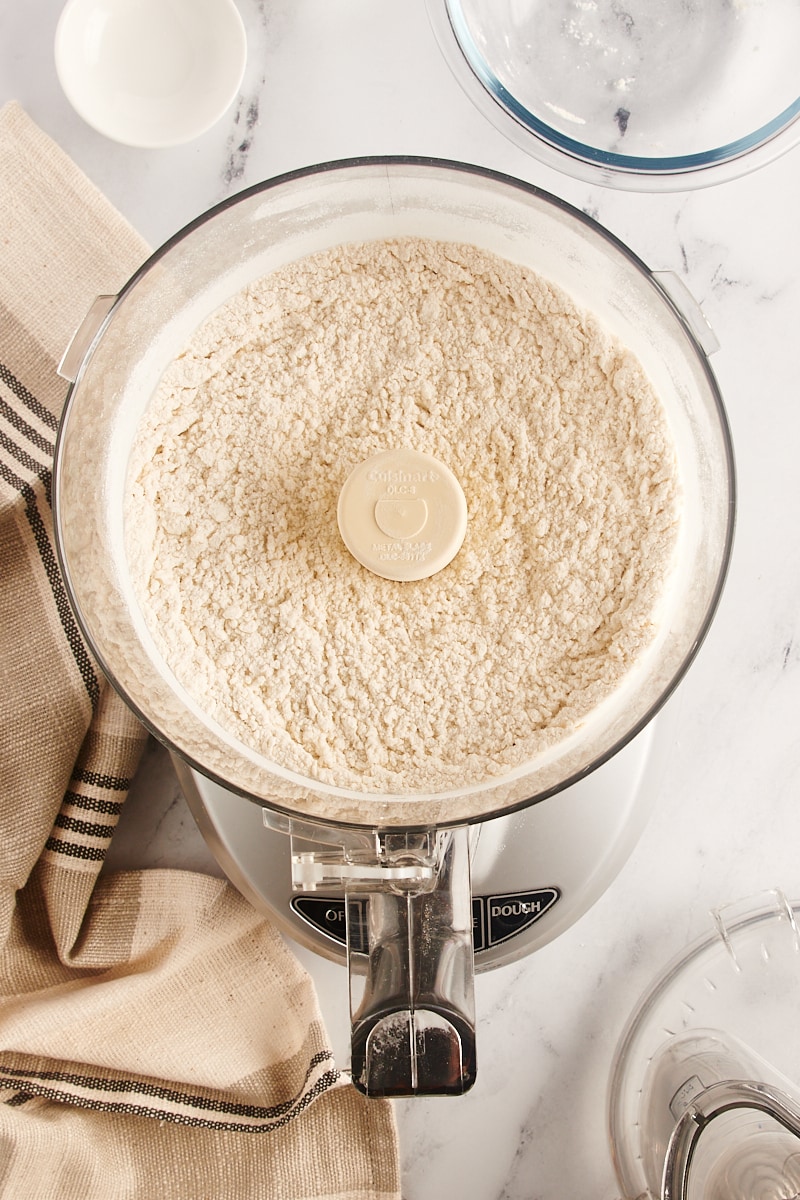
- Combine the dry ingredients. Place the flour, sugar, and salt in the bowl of a food processor. Pulse a few times to combine.
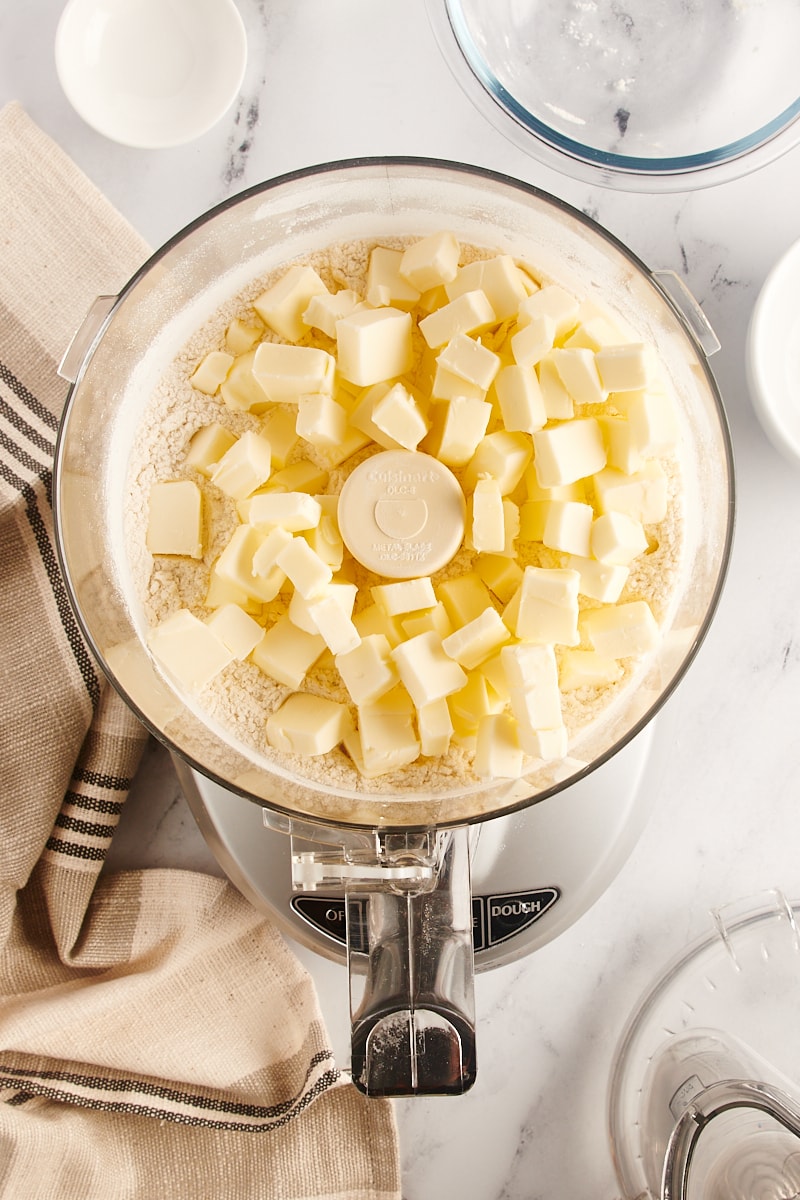
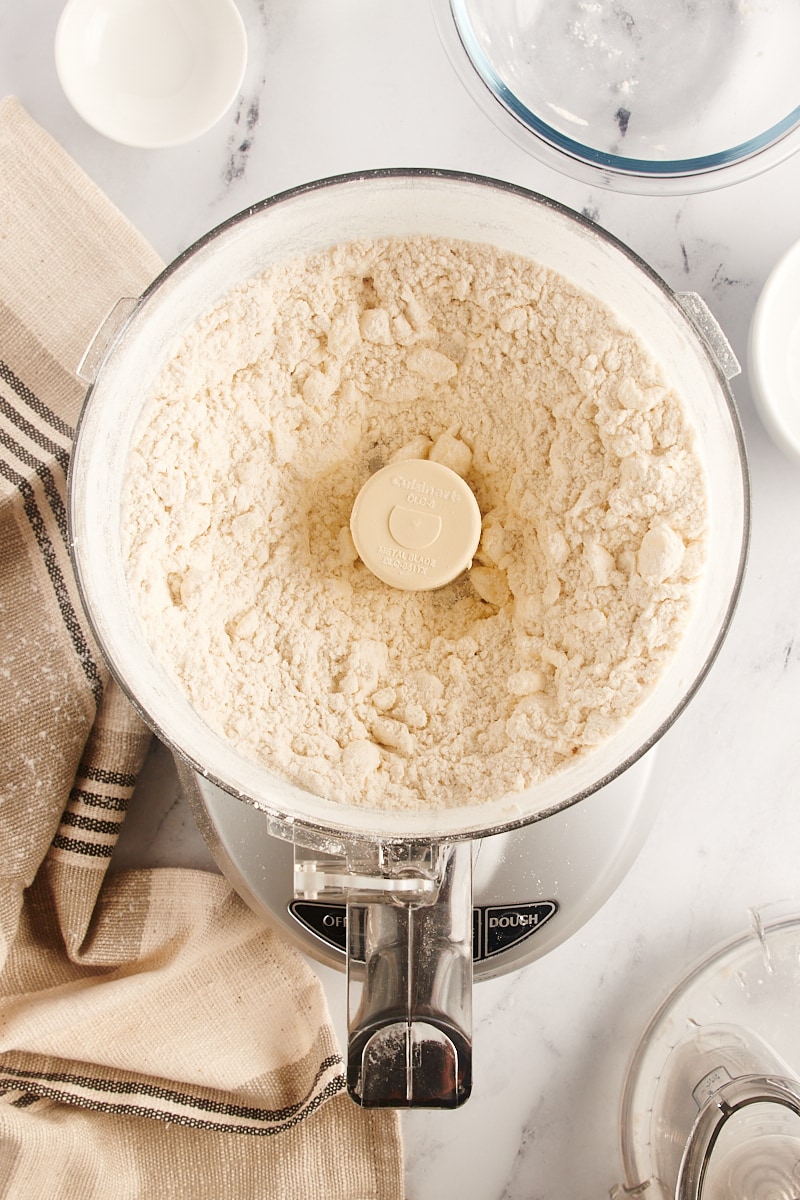
- Add the butter. Place the cubed butter in the bowl. Pulse several times until the butter is about the size of large peas.
- Add the water. Drizzle about half of the water over the flour mixture. Then cover and turn on the food processor, and gradually add more water through the tube on top until the dough begins to come together, mixing only until the dough starts to clump together.
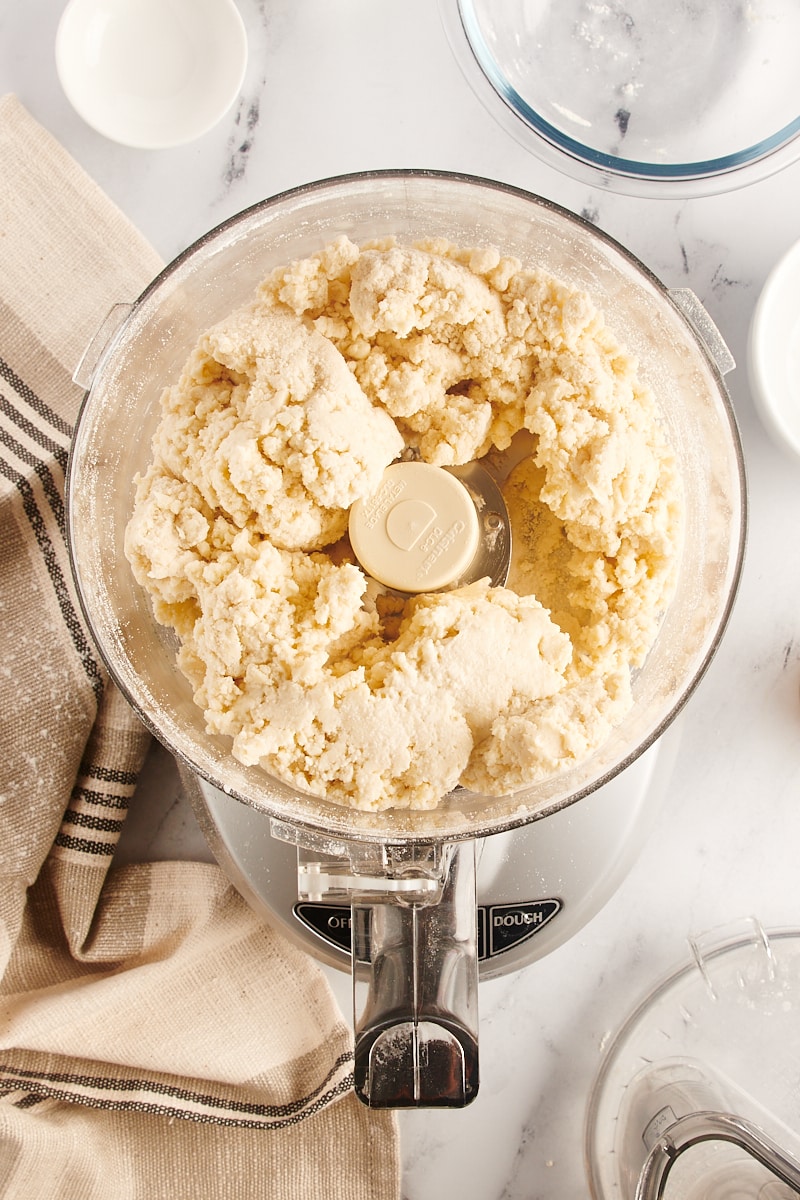
- Chill. Divide the dough in half. Then flatten each portion into a disc, wrap in plastic wrap, and refrigerate at least 2 hours or up to 5 days.
How to Roll Out Pie Crust
When it’s time to roll out your pie crust, there are just a few steps to make the process go perfectly.
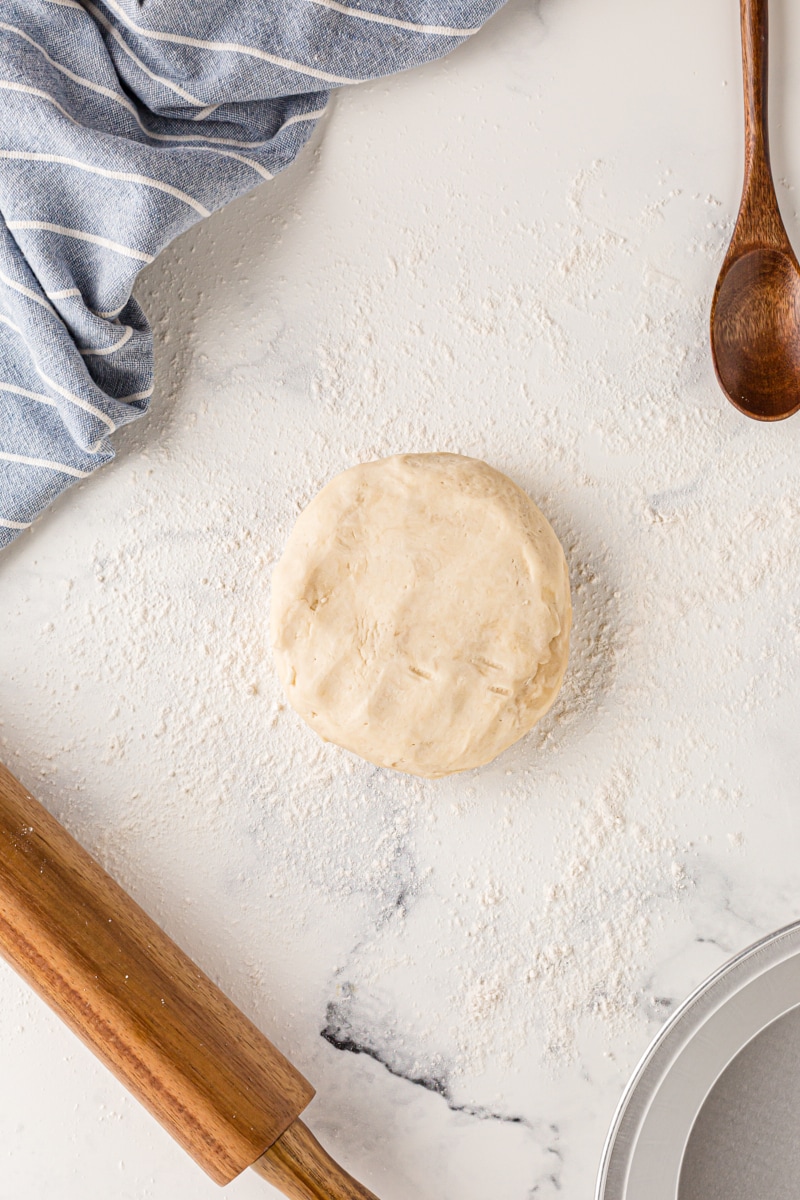
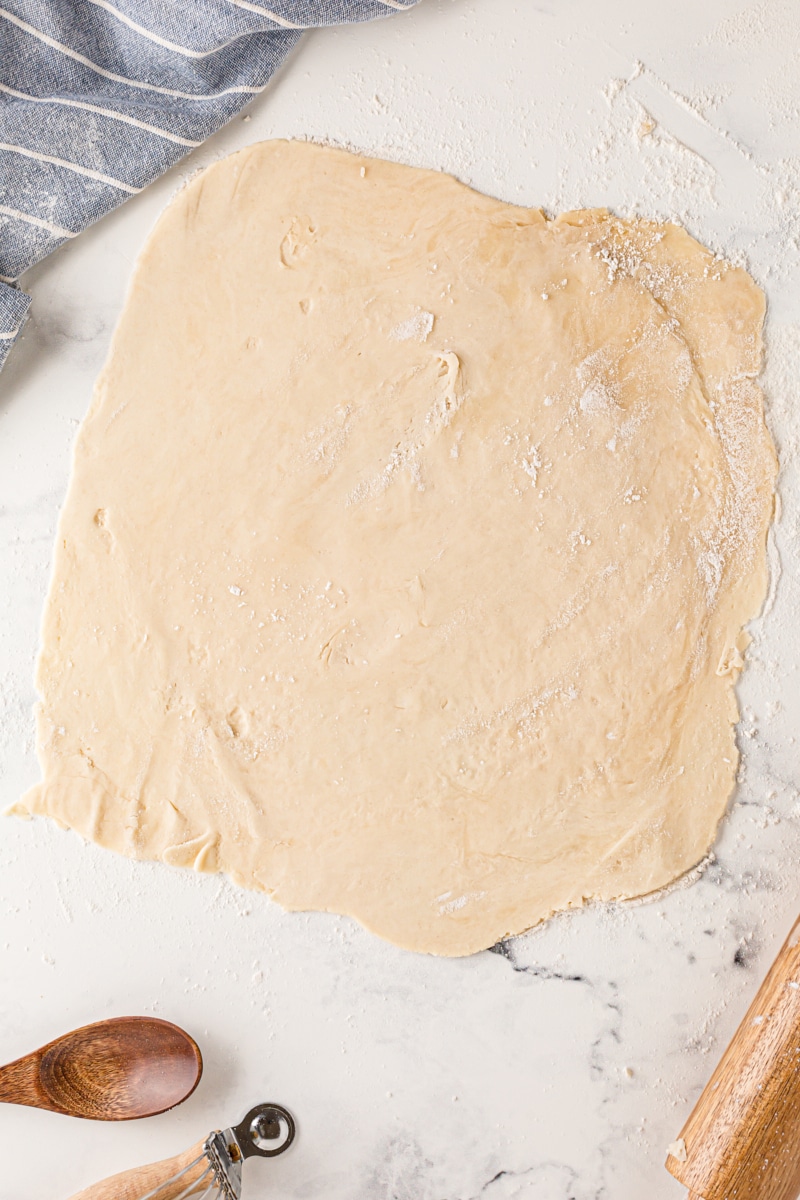
- Flour a clean surface. This can be a silicone mat, waxed paper, a pastry board, parchment paper, or even just your clean countertop. Use just enough flour to keep the crust from sticking to the surface. Heavily flouring the work surface will potentially incorporate too much extra flour into the crust, making it tough. As a bit of extra preparation, I also recommend placing a little reserve of flour to the side of your surface in case you need it after you start rolling.
- Place the chilled dough on the work surface. Remove the pie crust dough from the refrigerator and place it on your lightly floured surface. If the dough has been in the refrigerator for longer than a few hours, you may need to let it sit at room temperature for a few minutes so it will roll more easily. It still needs to be cold, but it should roll without extraordinary pressure while rolling.
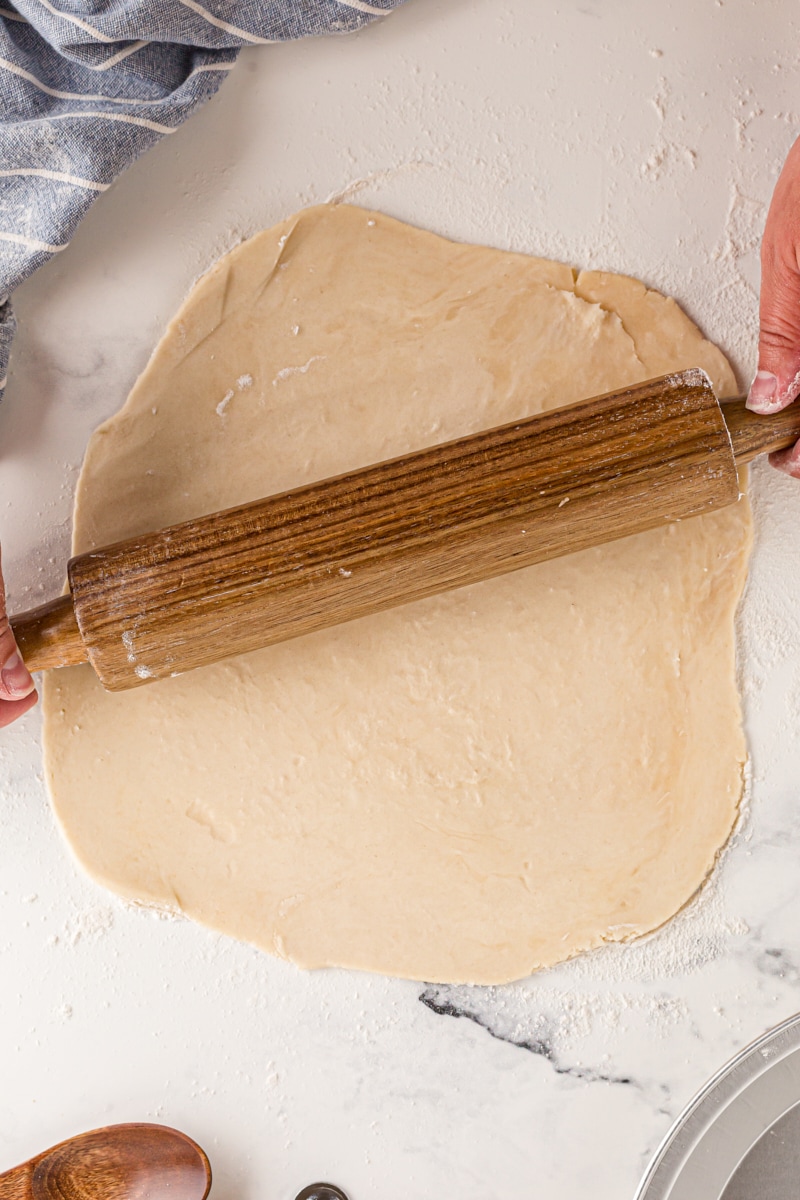
- Roll out the dough. Place your rolling pin in the center of the disc and roll outward. If your rolling pin is sticking to the dough, rub a little flour on it or sprinkle a bit on top of the dough. Rotate the dough 45 degrees, and repeat rolling from the center. Then repeat this process of rotating and rolling until the dough is the appropriate size and thickness. For a 9-inch pie, aim for a circle about 12 inches in diameter and 1/8-inch thick.
How to Transfer Pie Crust to the Pan
You’ve likely heard a few different ways to get your rolled pie crust into the pan. There are a couple of methods that I use successfully and can recommend.
One method is to fold the crust so that you can simply pick it up by hand. First, fold the crust in half to make a half circle. Next, fold it in half again to make a triangle. Finally, just place the crust in the pan with the point of the triangle in the center, unfold the crust, and fit it into the pan.
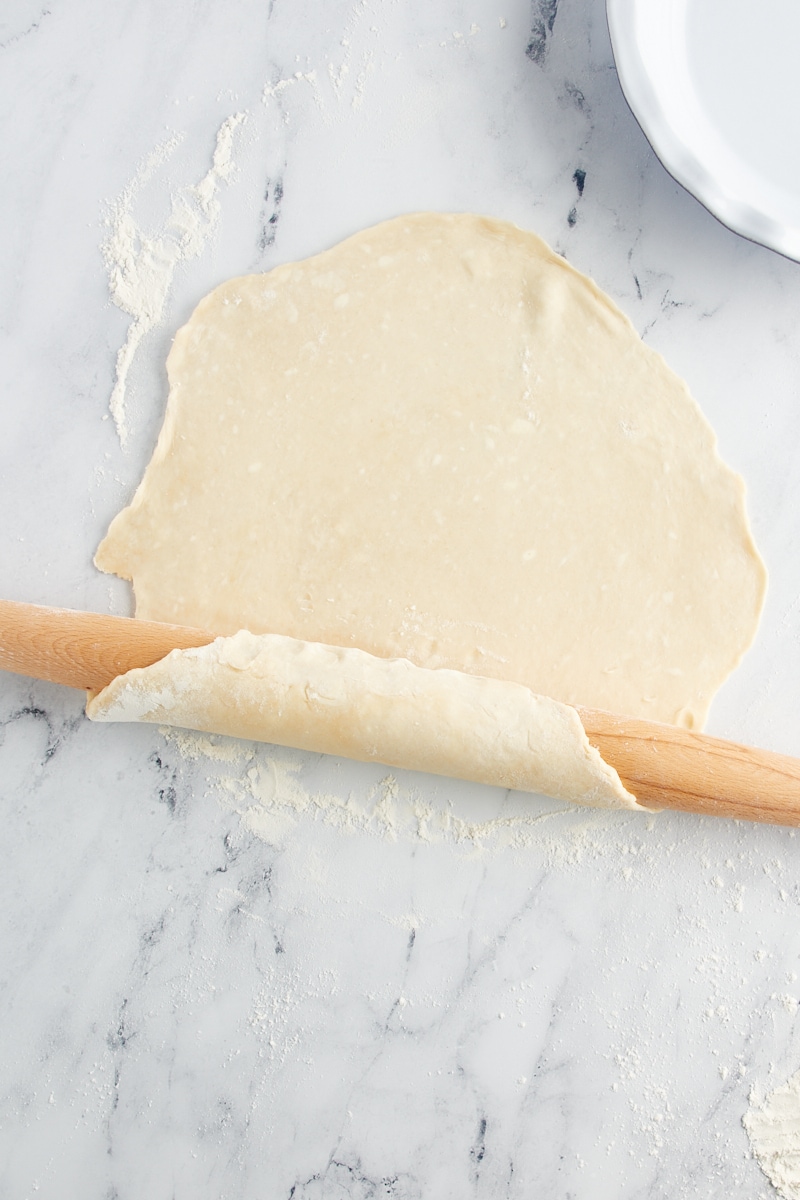
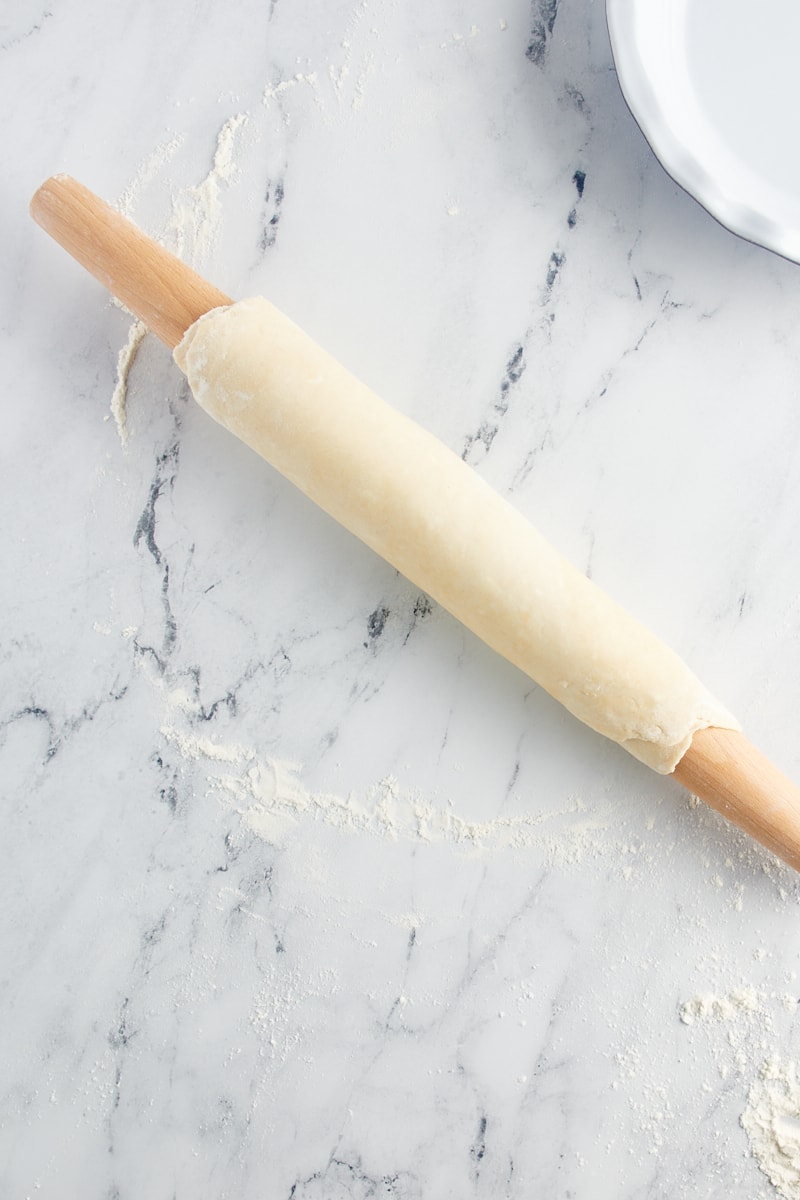
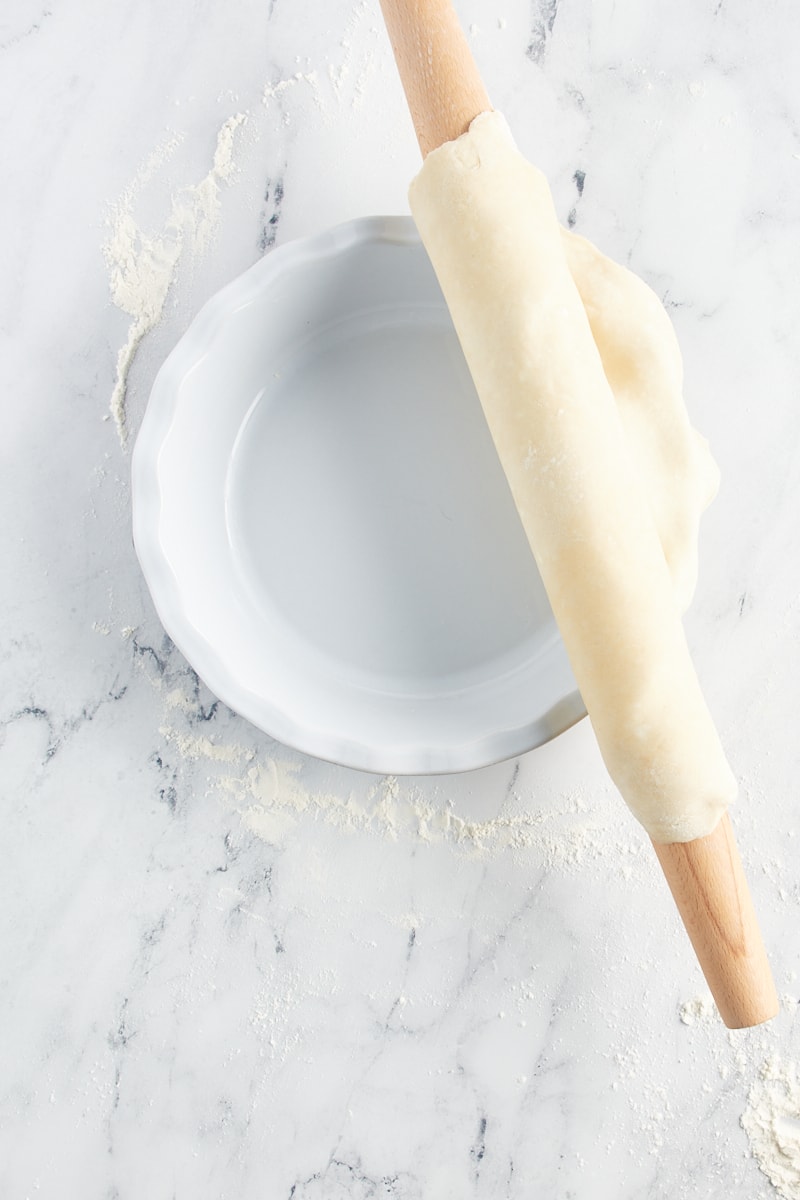
My preferred way to transfer pie crust to a regular pie plate is to use the rolling pin.
Start by placing the rolling pin near one edge of the crust. Wrap the end of the dough up onto the rolling pin, and roll forward to wrap the dough loosely around the rolling pin.
To transfer the dough, place the rolling pin near one edge of the pie pan. Unroll the crust so that it covers the pan with about a 1-inch overhang. Then, fit the pie crust dough into the pan, gently pressing it into the bottom and up the sides of the pan.

Tips for Transferring Pie Crust to a Pie Pan
Regardless of the method you use, there are a couple of things to keep in mind to make the process go smoothly.
First, sprinkle a little flour over the dough (or on your rolling pin, if that’s what you’re using) so that it doesn’t stick to itself during the transfer.
Secondly, take care not to stretch the dough as you’re handling it. Don’t pull on it to fold it, or stretch it to wrap it over the rolling pin. Keep it loosely folded or wrapped so that it won’t get stretched too far.
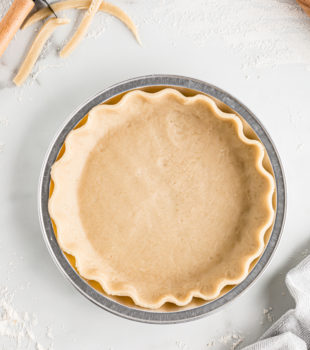
Ideas for Decorative Pie Crust Edges
Once your crust is in the pan, it’s time to dress it up! There are endless ways to decorate and crimp the edges of the crust.
Start by trimming any excess dough from the edges. You’ll want to leave enough to cover the edges. Ideally, you’ll want to leave an extra half inch or so to tuck under the edges to make a thicker edge that will hold the decoration well.
Get creative and see what kind of designs you can make! Here are a few of my favorite simple ways to decorate pie crusts.
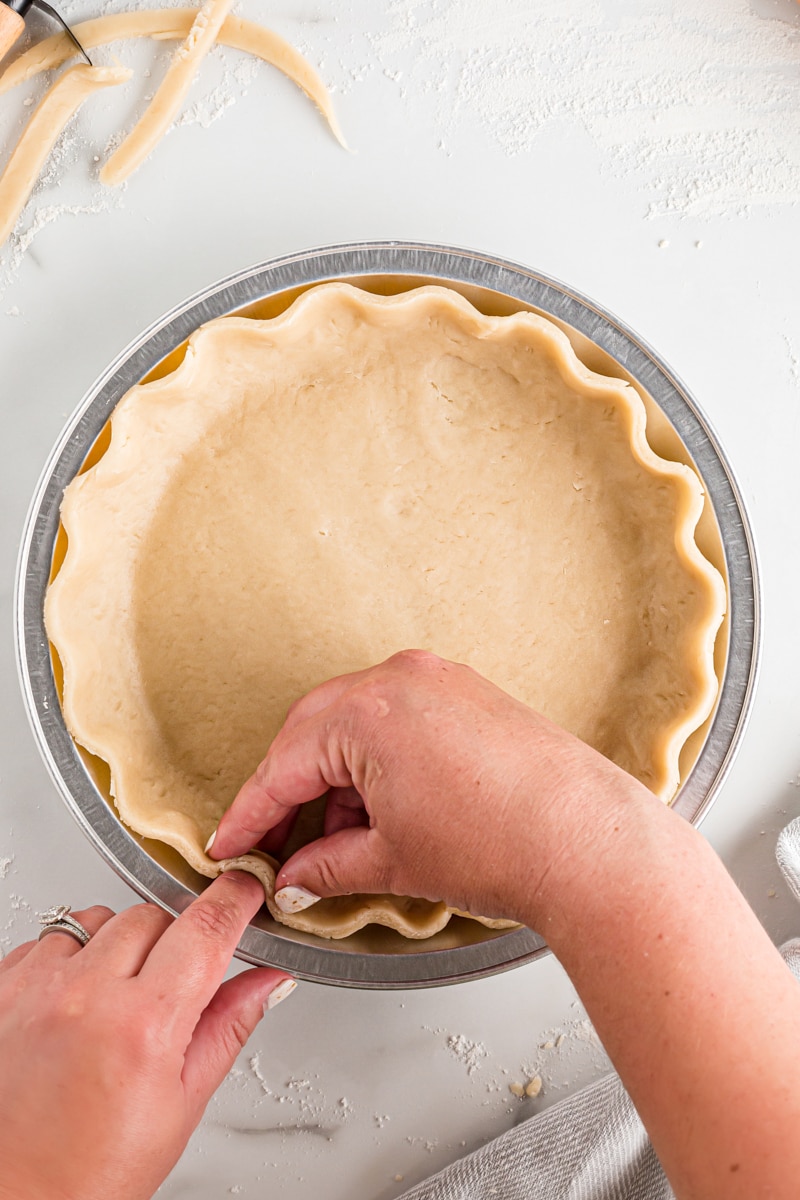

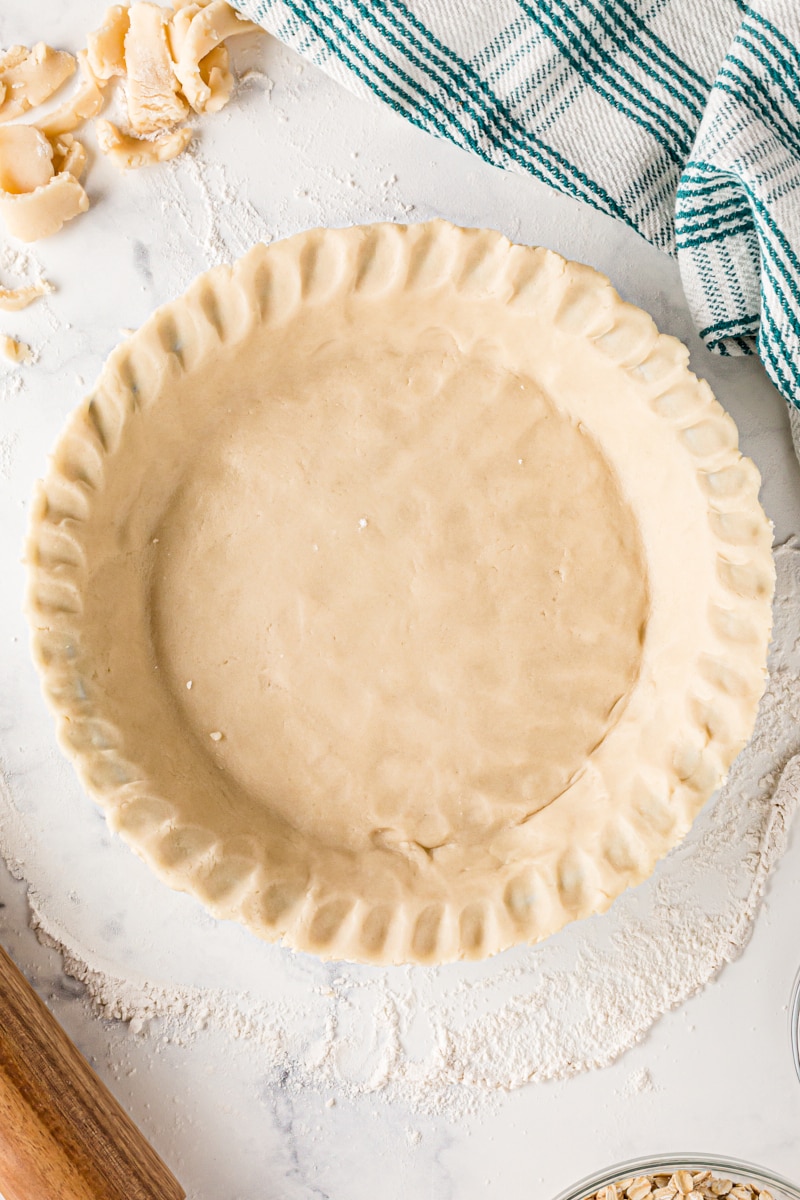

- Make a classic fluted edge. Use the thumb and forefinger of one hand to hold the dough while you use the knuckle of the forefinger on your other hand to press between.
- Use a fork. Make indentations with a fork all the way around the crust or at intervals. You can make a simple forked pattern, or go back around at an angle for a crosshatch or chevron pattern, as seen with Chocolate Chip Coconut Pecan Pie.
- Make a rope design. This is done much like the fluted edge but with two fingers on opposite hands at about a 45° angle to the pan. You may also be able to achieve this design by twisting the dough between your thumb and forefinger.
- Use a knife. Make partial cuts at intervals around the edges (like this Apple Crumb Pie), or cut the crust and alternate folding the cuts inward for a checkerboard look.
- Simply tuck under the edges. Make a thick edge with no adornment for a simple, modern look.
- Use a spoon. With the bottom of a spoon, make a single or double indentation for a scalloped look.
- Use kitchen tongs. Go around the edges of your crust with tongs, pressing into the crust without cutting all the way through it.
- Combine a couple of designs. Flute the edges and add a fork design. Try alternating different designs or combine some to make your own signature design.
- Get creative! Have fun finding new tools and new ways to decorate your pie edges.
After you’ve finished the pie crust edges, place the pan in the refrigerator or freezer for at least half an hour, or longer if your kitchen is especially warm. Chilling the dough means that design you just worked so hard to make will hold up better during baking.
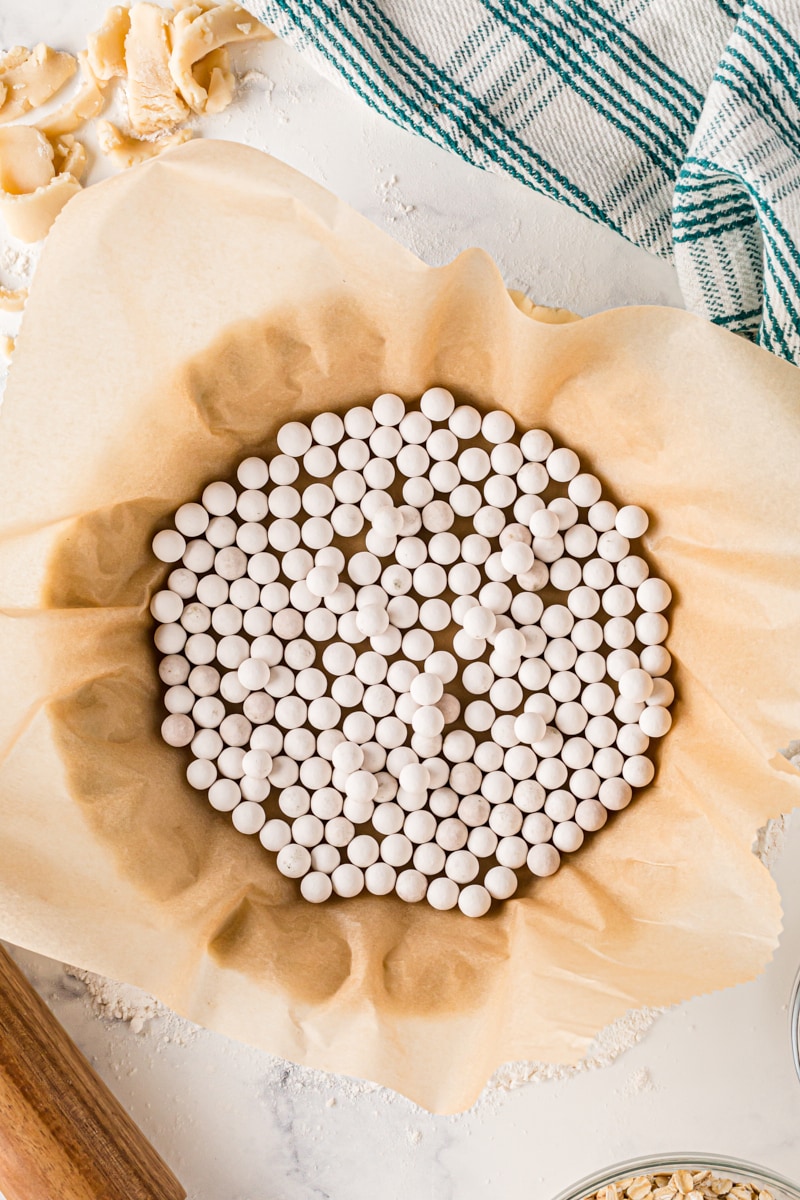
How to Blind Bake Pie Crust
Blind baking (or parbaking) is necessary if your crust needs to bake on its own briefly or even entirely before filling. If your recipe requires this step, then there are a couple of steps to take to make sure it keeps its shape.
First, make sure to chill your crust well. After placing it in the pan and getting the edges just right, refrigerate or freeze the crust briefly. This will help keep the unfilled crust from shrinking.
Next, you may need to dock the crust. That simply means using a fork to make some small holes in the crust. While this isn’t absolutely necessary, it can help the crust bake more thoroughly without puffing.
And lastly, use pie weights. Line the crust with parchment paper, and then add pie weights on top of the lining to cover the entire bottom surface. You can use other things like dried beans, rice, or sugar, but I recommend pie weights if at all possible.
Depending on the recipe, you’ll either bake the crust partially or fully. The recipe should direct you how long to bake the crust to get it to the proper doneness.
How long to par bake a pie crust that will be baked longer with a filling will depend on how long the filling needs to bake, but you’ll likely want the crust to be a light golden brown. For a fully-baked pie crust that has an unbaked filling, the crust should be completely baked and browned.
Follow your recipe’s directions for baking temperature and time. As a general guideline, at 375°F, a partially-baked crust will need about 15 minutes in the oven followed by another 5 minutes without the weights and lining. The edges should be lightly golden and the bottom should be set. For a fully-baked crust, bake for 15-20 minutes, then remove the pie weights and lining and continue baking for 5-10 minutes until the crust is fully golden and crisp.
Recommended Tools for Making Pie Crust
You don’t need much for making pie crusts. Here are the tools I recommend for making a basic pie crust recipe. For more handy pie tools, be sure to see my Pie Baking Essentials in my Amazon storefront.
Bake or Break is a participant in the Amazon Services LLC Associates Program, an affiliate advertising program designed to provide a means for us to earn fees by linking to Amazon.com and affiliated sites.
- Pastry blender (or pastry cutter) – For mixing by hand, I prefer using a pastry blender to cut the cold butter into the flour.
- Food processor – Mixing the dough with a food processor is a quicker method of mixing. This is a good tool to use if you have trouble getting the dough mixed by hand without over-mixing.
- Digital scale – Use this not only to measure your flour, but also to help divide your pie dough evenly when it’s time to wrap and chill it.
- Rolling pin – There are three basic kinds of rolling pins – tapered (or French), cylindrical, and handled. And they can be wooden, silicone, metal, or some other material. Tapered rolling pins are often preferred for rolling pastry doughs like pie crust, but you should use whatever you’re most comfortable using.
- Ruler – Just an old-fashioned 12-inch ruler is helpful for measuring your crusts thickness and diameter when rolling it. There are pastry mats and other tools that help you measure, but I often default to the simplicity of a ruler.
- Pie plate – Pie pans come in all kinds of materials and designs. I most often use a metal pie plate for how predictably and thoroughly it will bake the pie. If you prefer glass or ceramic, keep in mind that those materials conduct heat differently and may not give quite the same results.
Tips for Success
Hopefully, you’re feeling ready to make your own homemade pie crust. Here are a few final tips to help make sure your crust turns out perfectly.
- Temperature matters. Make sure your butter and water are both cold. Once you get them on your counter, work quickly so that they don’t get too warm. Keeping your crust cool as you roll it out is important, too. And once you’ve trimmed and crimped the edges, letting the crust chill in the refrigerator or freezer will help it keep its shape and minimize shrinking.
- Don’t over-mix. If you overdo the mixing, you’ll create excess gluten and lose the flaky texture. That means a tough pie crust.
- Only use as much water as you need. Mix it into the dough just until the dough begins to form large clumps. Too much water may lead to needing more flour and more mixing, meaning your crust will be tough. Too little water may make your crust crumbly. You’ll likely find that the amount of water you need will vary with the temperature and humidity of the environment.
- Don’t let the trimmed scraps go to waste. Make pie crust cookies!
Can Unbaked Pie Crust Be Frozen?
Yes! Mix, form, and wrap the discs as directed in the recipe. Place the wrapped dough in an airtight, freezer-safe bag or container. Properly stored, it should keep in the freezer up to 3 months. Thaw overnight in the refrigerator, and then allow it to sit at room temperature for a few minutes until it’s soft enough to roll.
Pie Recipes
Ready to put your pie crust confidence to work? Try my classic Pecan Pie, Black Bottom Oatmeal Pie, Chess Pie, or any of my other traditional crust pies using this pie crust recipe.
All-Butter Pie Crust
Ingredients
- 2 ½ cups (300 g) all-purpose flour
- 2 teaspoons sugar*
- 1 teaspoon salt
- 1 cup (226 g) unsalted butter, cold and cut into 1/2-inch cubes
- 6 to 8 tablespoons (90 to 120 ml) very cold water
Recommended Products
Instructions
To mix by hand
- Whisk together the flour, sugar, and salt.
- Add the cold butter, and mix with a pastry blender, a fork, or two knives until the butter is the size of peas.
- Drizzle about 2 tablespoons of water over the dough mixture. Continue mixing, adding about a tablespoon of water at a time until the dough begins to come together in large clumps. (You may not need all of the water.) Do not over-mix.
- Divide the dough in half, and wrap each half well in plastic wrap. Refrigerate at least 2 hours and up to 5 days.
To mix in the food processor
- Place the flour, sugar, and salt in the bowl of the food processor. Pulse a few times to mix.
- Add the butter, and pulse several times until the butter is the size of large peas.
- Drizzle about half of the water over the dough mixture. Cover and turn on the food processor, and gradually add more water through the tube on top until the dough begins to come together. Do not over-mix.
- Divide the dough in half, and wrap each half well in plastic wrap. Refrigerate at least 2 hours and up to 5 days.
Notes
- *The sugar is optional if you don’t want that bit of sweetness in your crust.


2 Comments on “All-Butter Pie Crust”
I made your all butter pie crust yesterday! It was perfect. I am a little frightened of pie crust, not had good luck but your recipe was spot on! It turned out perfectly. Thanks for an awesome recipe, one that I will use from now on. No more fear!!
That is wonderful to hear, Jan! You’ve made my day!