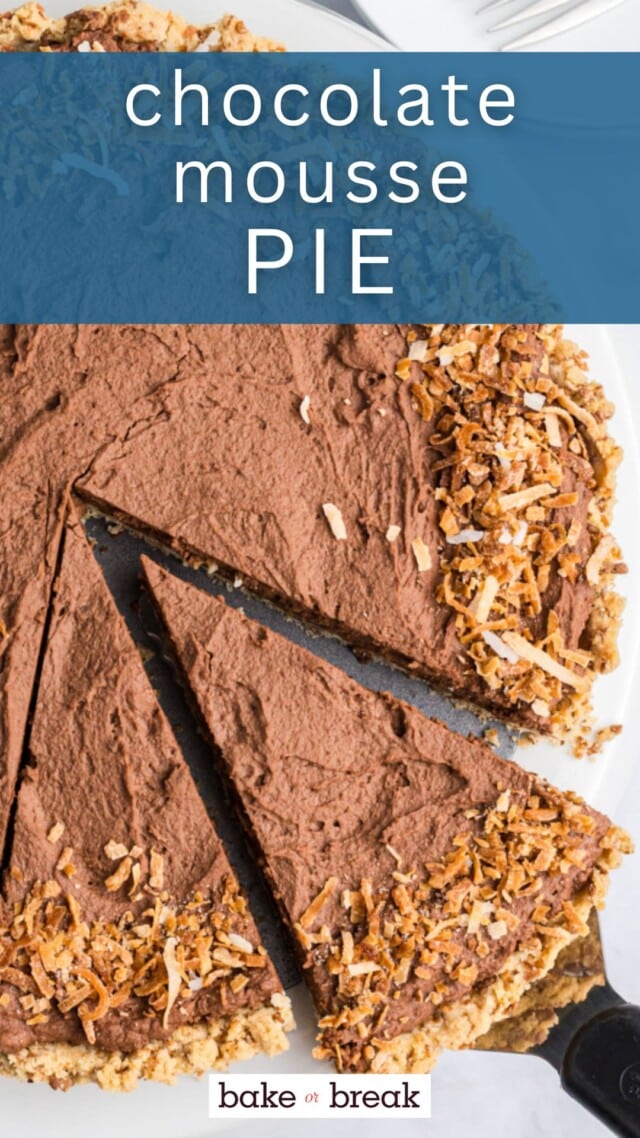
Rich, airy chocolate mousse meets a crisp, buttery crust — this chocolate mousse pie is elegant, easy, and flexible for your tastes.
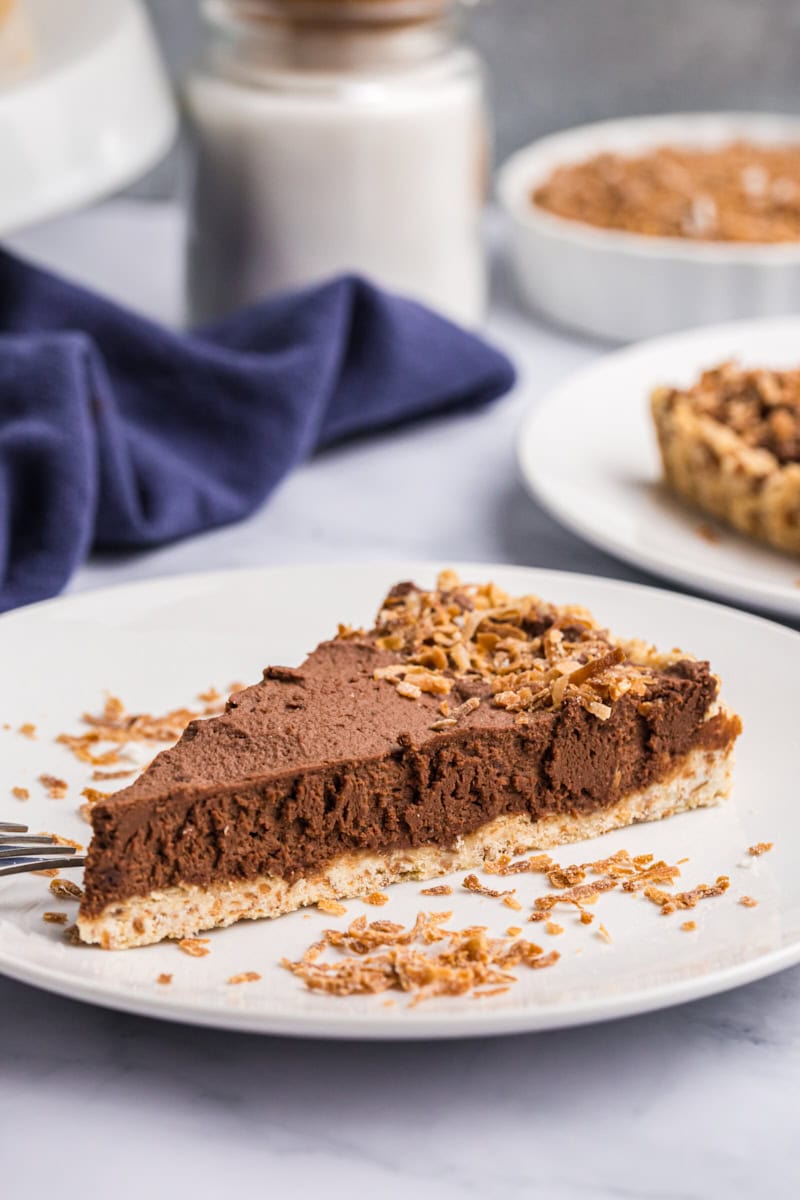
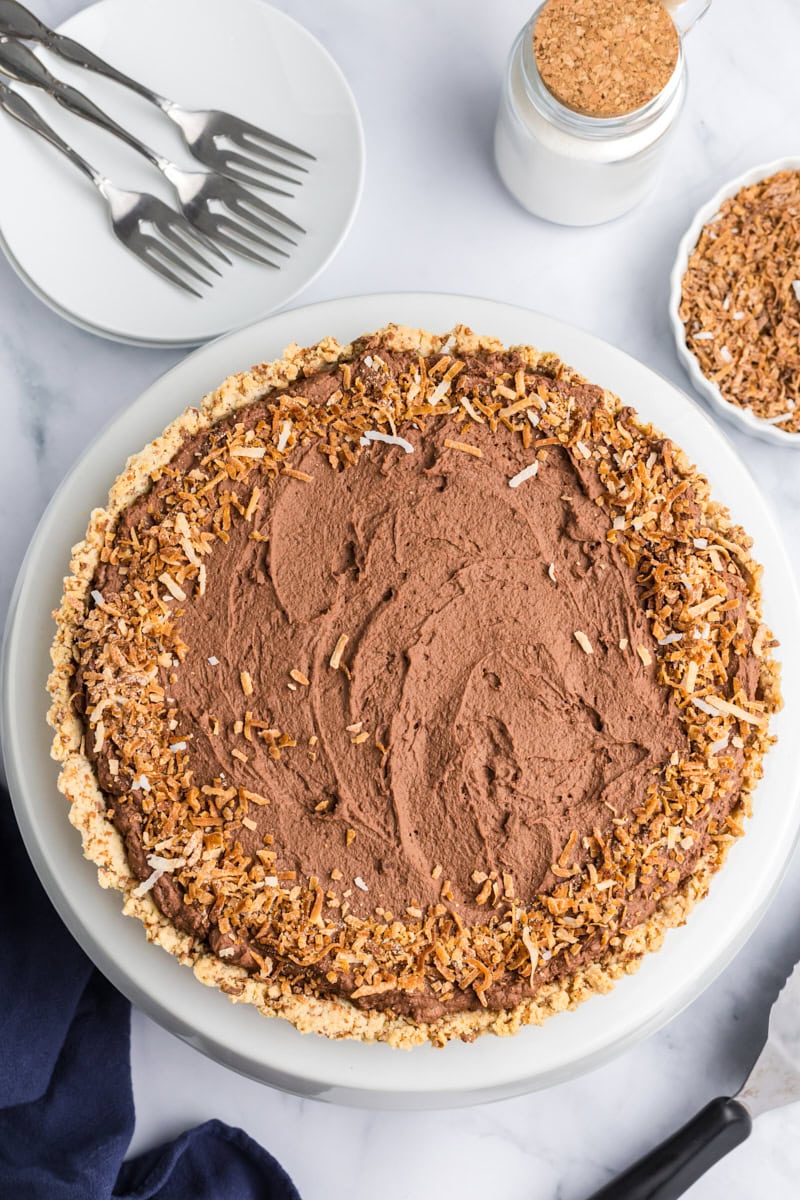
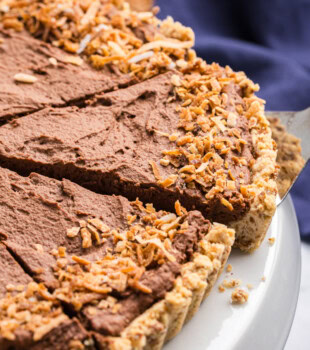
Chocolate mousse pie is one of those desserts that feels a little fancy but is surprisingly simple to make. This version pairs a light, creamy, no-bake chocolate mousse with a toasted coconut shortbread crust for extra flavor and texture, making it just as at home on a holiday table as it is for a casual dinner with friends.
That said, the mousse itself is the real star here. While I love the coconut crust, I’ve included several classic crust options below so you can make this pie exactly the way you like it — whether that’s coconut, vanilla wafer, chocolate cookie, or something else entirely.
Why You’ll Love This Chocolate Mousse Pie
- The mousse is light but rich. Creamy, chocolate-forward, and smooth without feeling heavy.
- It’s easier than it looks. No baking the filling, no complicated steps, and no special equipment required.
- The crust is customizable. Toasted coconut adds something special, but you’ll find plenty of familiar alternatives if coconut isn’t your thing.
- Perfect for make-ahead desserts. This pie needs time to chill, which makes it ideal for entertaining or planning ahead.
- Works in different pans. Make it as a classic pie or dress it up in a tart pan for a more elegant presentation.
Key Ingredients
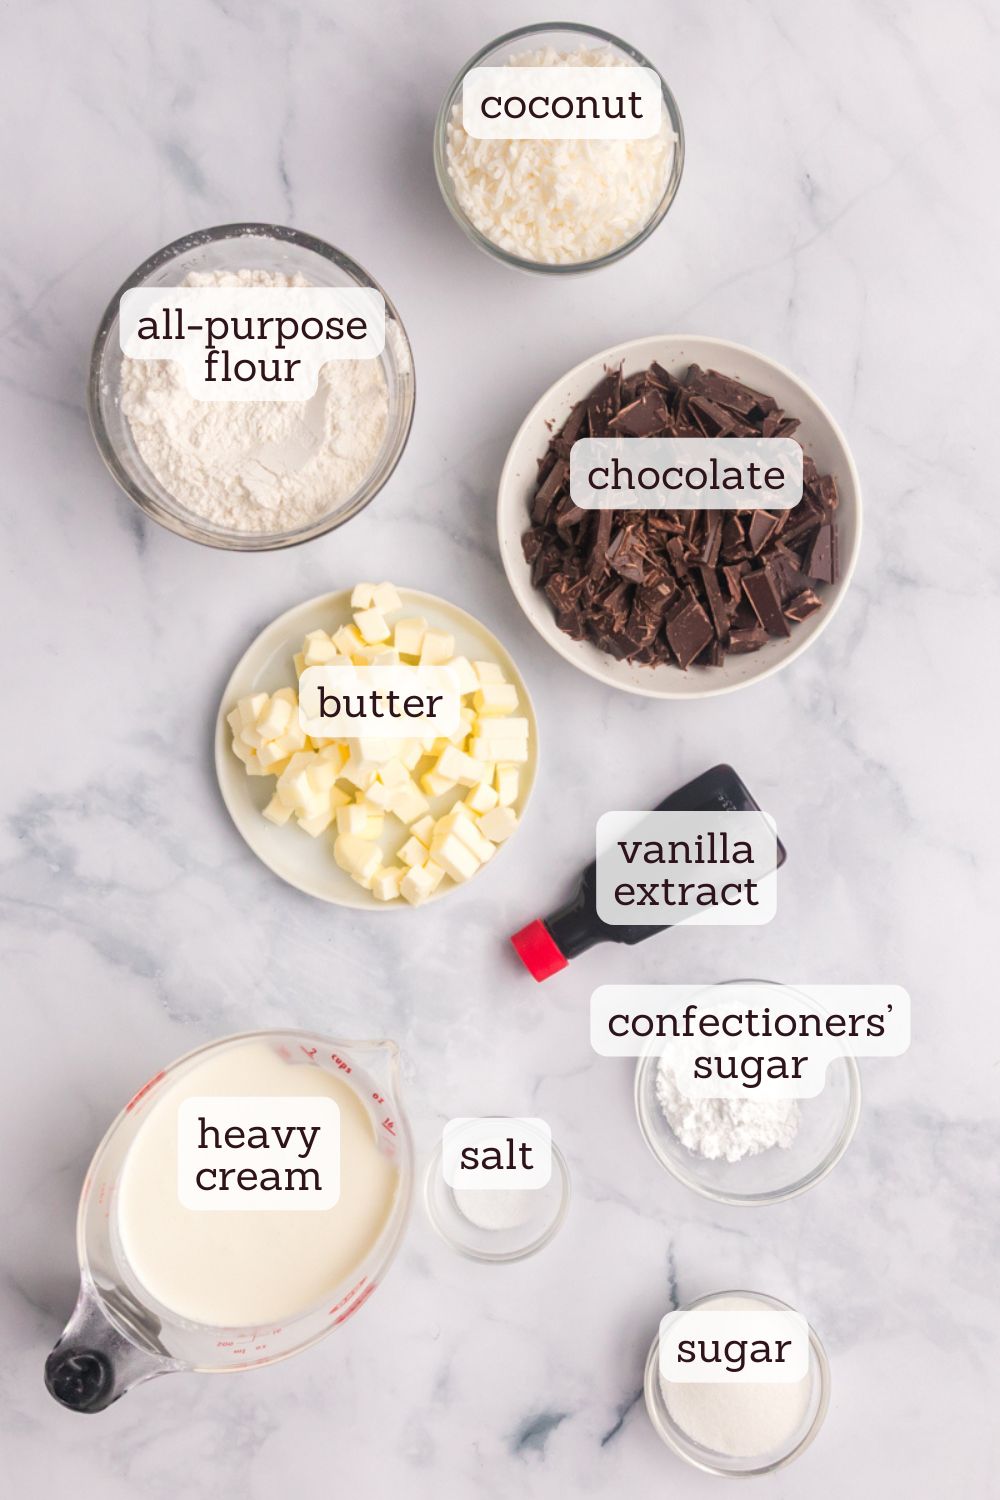
- Dark chocolate – This is where most of the flavor comes from, so use a good-quality dark chocolate you enjoy eating on its own. I like something around 60–70% cacao for a balance of richness without bitterness.
- Heavy cream – Whipped cream gives the mousse its light, airy texture. Soft peaks are key here so the mousse stays smooth and creamy rather than dense.
- Vanilla extract – Just enough to round out the chocolate and add warmth without competing with it.
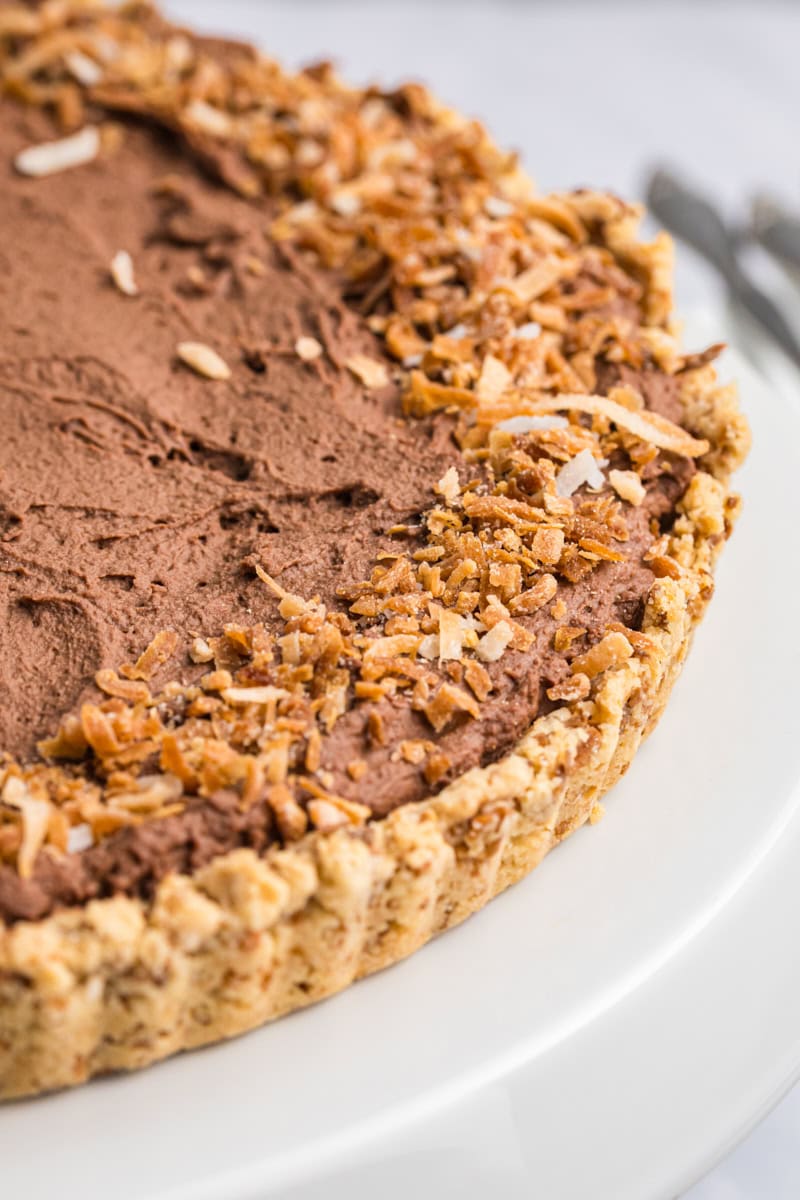
- Sweetened shredded coconut – Used in the crust for texture and flavor. Toasting it first deepens the coconut flavor and keeps the crust from tasting flat.
- Butter – Cold butter helps create a crisp, shortbread-style crust that holds together well once baked and chilled.
Crust Options and Substitutions
While this pie is shown with a toasted coconut shortbread crust, the chocolate mousse filling is very adaptable. If coconut isn’t your thing or you simply want a more classic base, any of the options below work beautifully.
- Vanilla wafer crust – A familiar, lightly sweet option that pairs well with chocolate and keeps the focus on the mousse. The crust from my vanilla bean cheesecake is a good option.
- Chocolate cookie crust – Great if you want a deeper chocolate flavor throughout the pie. My Oreo pie‘s cookie crust would pair nicely.
- Graham cracker crust – A simple, classic choice with just enough structure and sweetness. If you don’t have a go-to recipe, try the one I use for my s’mores pie.
- Tart pan vs pie pan option – This mousse also works well in either, although tart pan with a removable bottom gives a more polished presentation. Round is classic, but a long rectangular tart pan (4″ x 13″) looks elegant, too.
How to Make Chocolate Mousse Pie
Start with the crust.
If you’re using the toasted coconut crust, begin by baking it until lightly golden and set. This helps the crust hold together once sliced and adds extra flavor. Be sure to let it cool completely before adding the filling so the mousse stays light and creamy.
Melt the chocolate gently.
Melt the chocolate just until smooth, then let it cool slightly. You want it warm enough to blend easily, but not hot. Too much heat can deflate the whipped cream when they’re combined.
Whip the cream to soft peaks.
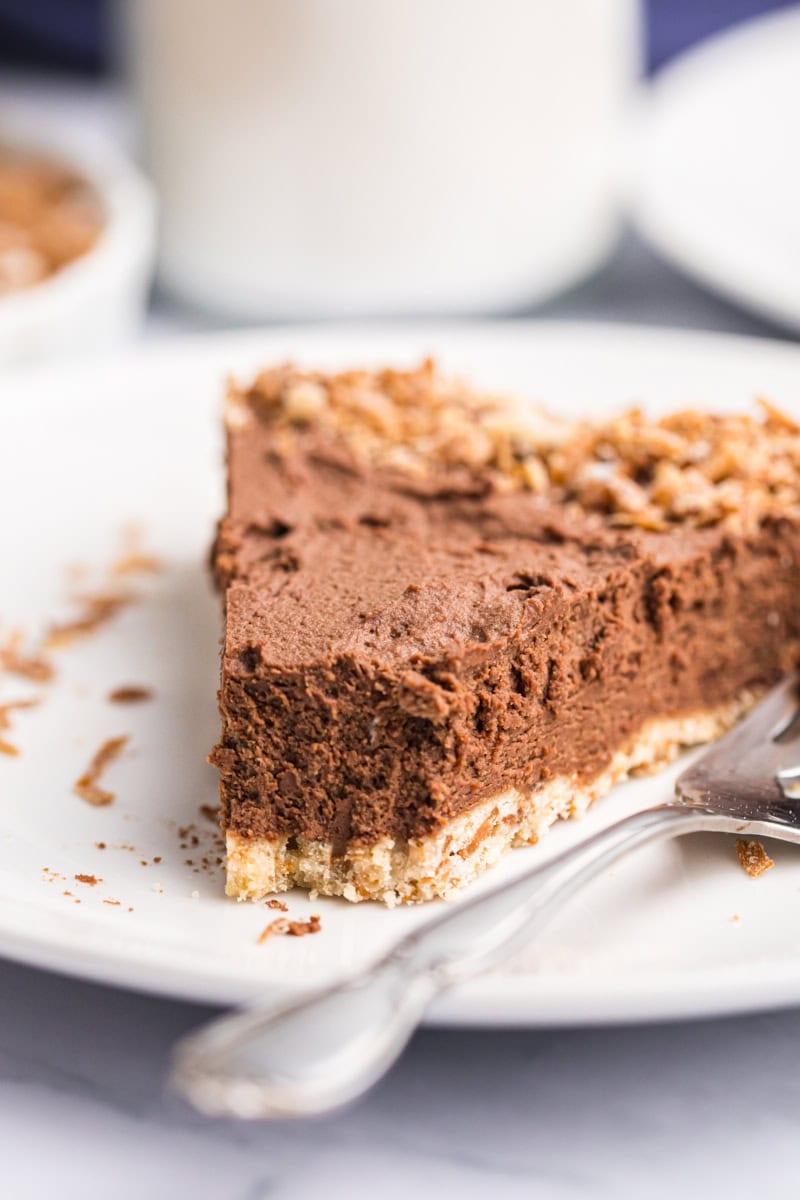
Whip the heavy cream until it holds soft peaks that gently fold over. This is what gives the mousse its airy texture. Stiff peaks can make the filling dense or grainy, so it’s better to stop a bit early.
Lighten the chocolate first.
Stir a small portion of the whipped cream into the melted chocolate to loosen it. This step makes it much easier to fold in the rest of the cream without losing volume.
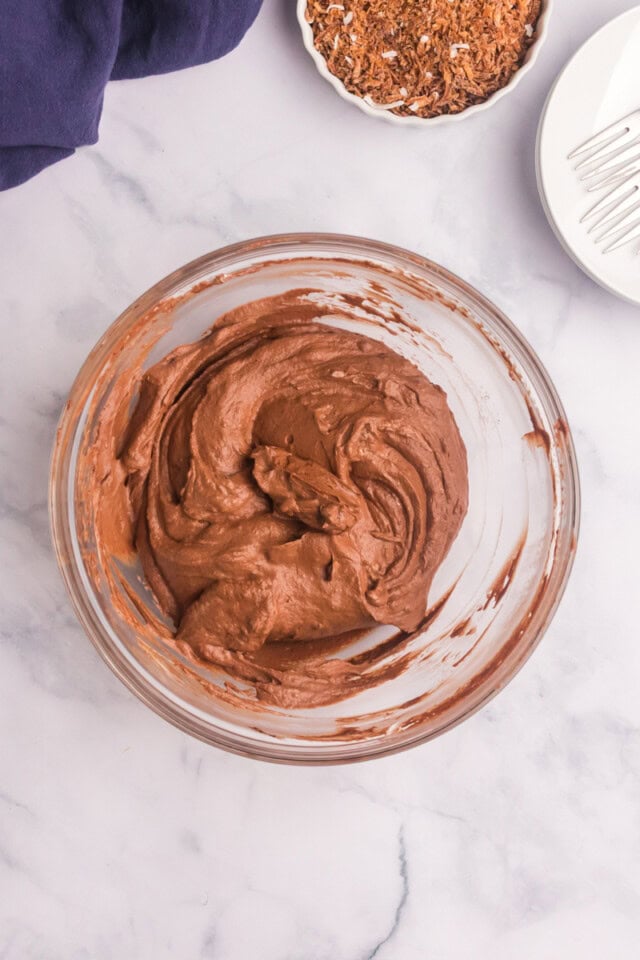
Fold gently for a smooth mousse. Add the remaining whipped cream and fold just until combined. Take your time and use a light hand. Over-mixing can knock out the air that gives the mousse its signature texture.
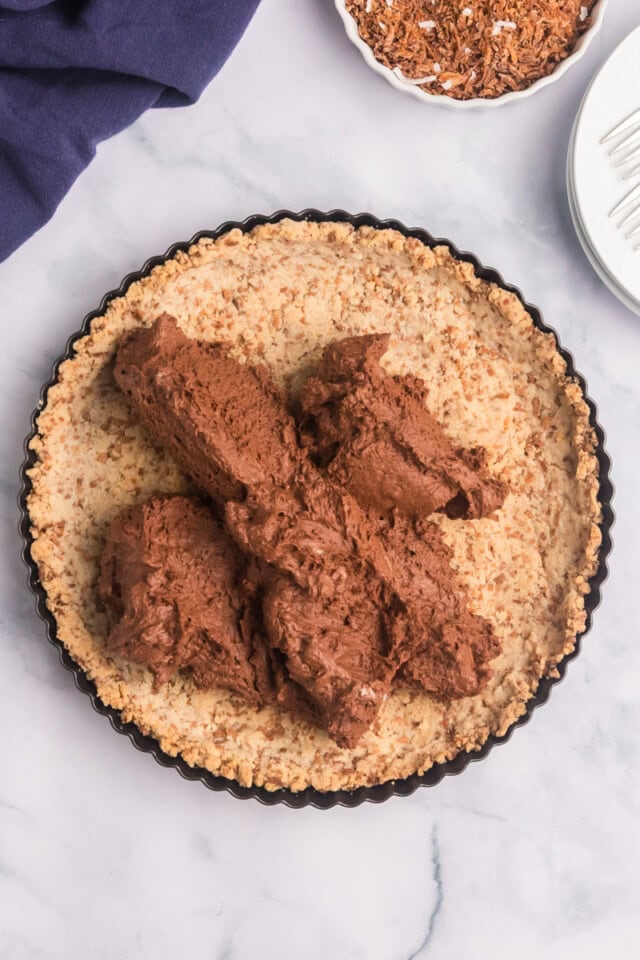
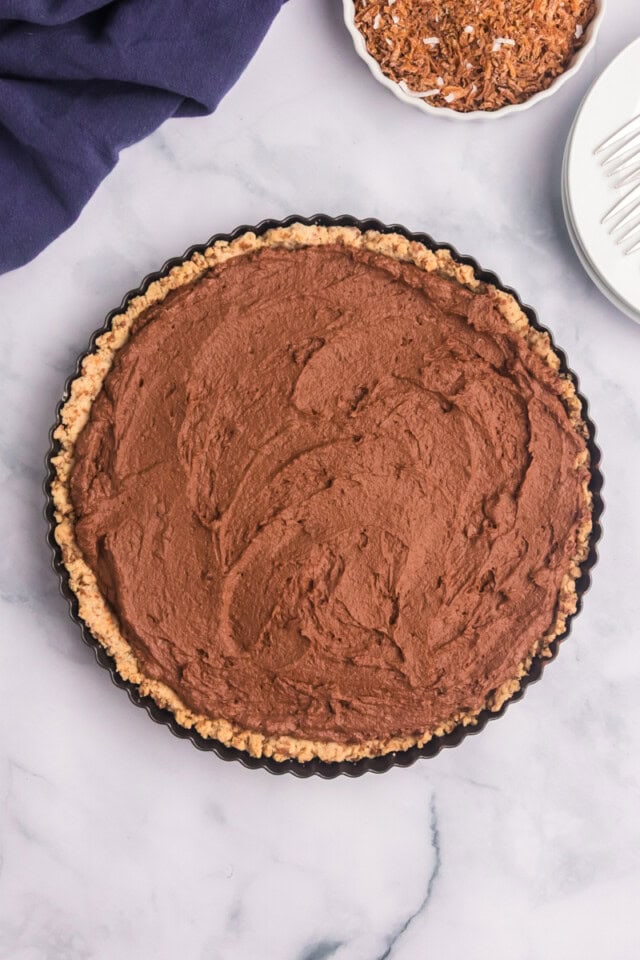
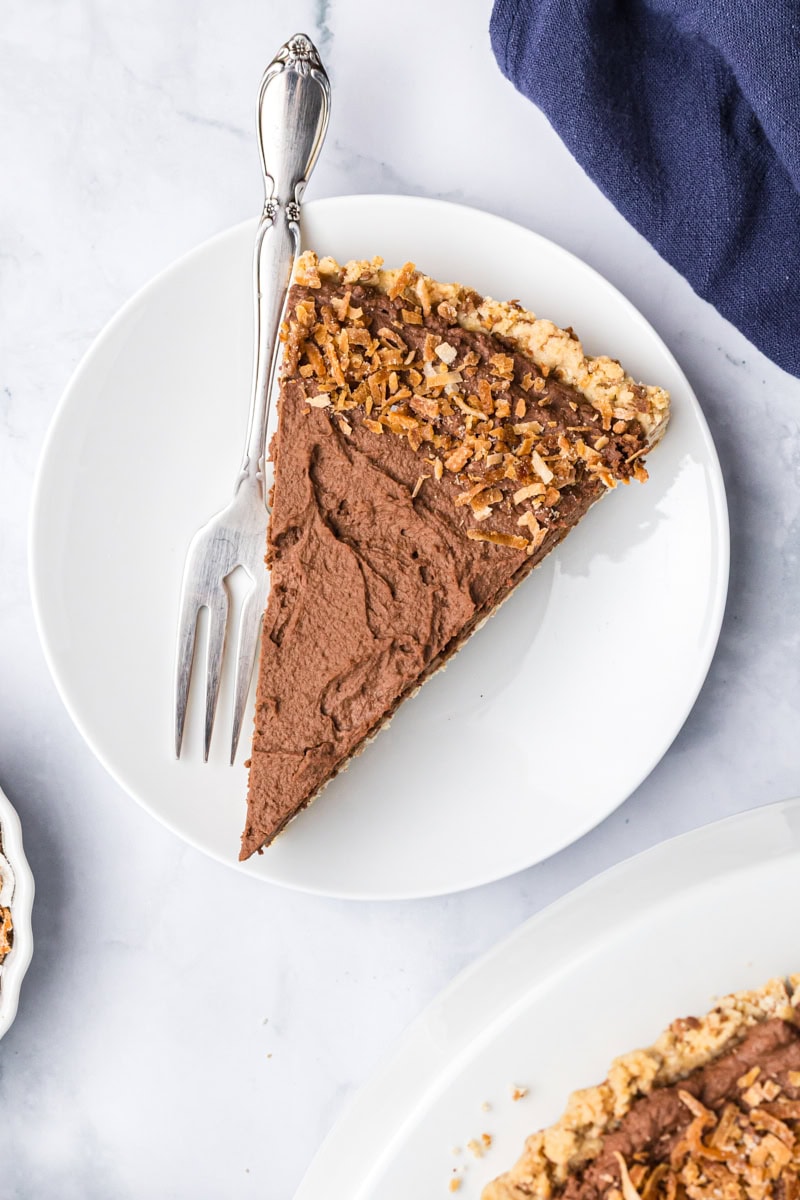
Chill until set. Spread the mousse evenly into the cooled crust and refrigerate for at least a couple of hours. The mousse will firm up as it chills, making the pie easy to slice while staying soft and creamy.
Tips for Success
- Let the chocolate cool slightly. After melting, give the chocolate a few minutes to cool before adding the whipped cream. If it’s too hot, it can melt the cream and flatten the mousse.
- Soft peaks make a lighter mousse. Stop whipping the cream when it forms soft, pillowy peaks. This helps the mousse stay smooth and airy. If the cream is whipped too stiff, the filling can turn dense or slightly grainy.
- Use a gentle folding motion. Folding — rather than stirring — keeps air in the mousse. A rubber spatula and slow, deliberate strokes work best here.
- Chill time matters. Plan for at least a couple of hours in the refrigerator. The mousse firms up as it chills, making the pie easier to slice and giving it the right creamy-but-set texture.
- For clean slices. Use a sharp knife and wipe it clean between cuts. This is especially helpful once the pie is fully chilled.
Variations & Serving Ideas
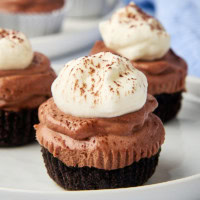
- Add a finishing touch: Top the pie with lightly sweetened whipped cream, chocolate curls, or a dusting of cocoa powder for a simple, classic look.
- Nut toppings: For a bit of crunch, sprinkle chopped toasted nuts over the top. Glazed or candied nuts add sweetness and work especially well if you’re serving this for a holiday or special occasion.
- Make it extra chocolatey: Drizzle the finished pie with melted chocolate or a simple chocolate sauce just before serving for a more indulgent presentation.
- Dress it up as a tart: For a more polished look, make the mousse in a tart pan with a removable bottom and finish with a decorative topping like nuts, shaved chocolate, or piped whipped cream.
- Keep it simple: This pie is rich enough to stand on its own. A clean slice served plain lets the chocolate mousse really shine.
Storage & Make-Ahead
Refrigerator: Cover the pie loosely and store it in the refrigerator for up to 3 days. The mousse holds its texture well and stays smooth and creamy.
Make-ahead tips: This pie is a great make-ahead dessert. You can prepare it a day in advance and keep it chilled until you’re ready to serve. Add any toppings just before serving for the best appearance.
Freezer: For longer storage, the pie can be frozen for up to 1 month. Wrap it tightly to prevent freezer burn. Thaw overnight in the refrigerator before serving.
A Chocolate Mousse Pie You Can Make Your Own
This chocolate mousse pie is one of those recipes that looks impressive but is wonderfully straightforward to make. The creamy chocolate filling works just as well with a toasted coconut crust as it does with more classic options, making it easy to adapt for different tastes and occasions.
Whether you serve it simply or dress it up with toppings, this is a dessert that’s meant to be enjoyed without fuss. Perfect for planning ahead, sharing with friends, or treating yourself to a really good slice of chocolate.
More Make-Ahead Chocolate Desserts


Chocolate Mousse Pie
Ingredients
For the crust:
- ¾ cup (64 g) sweetened shredded coconut, plus more for optional garnish
- 1 ¼ cups (150 g) all-purpose flour
- 3 tablespoons (37 g) granulated sugar
- ¼ teaspoon salt
- ½ cup (113 g) unsalted butter, cold and cut into 1/2-inch cubes
For the filling:
- 1 cup (170 g) dark chocolate, about 70% cacao
- 2 tablespoons (14 g) confectioners' sugar
- 1 ½ teaspoons vanilla extract
- 1 ½ cups (360 ml) heavy cream
Recommended Products
Instructions
To make the crust:
- Preheat oven to 350°F (175°C). Place the coconut in a single layer on a lined, rimmed baking sheet. Bake for 10 to 12 minutes, stirring every few minutes, until the coconut is toasted. Set aside to cool slightly.
- Place the flour, sugar, and salt in a large mixing bowl, and stir to combine. Mix in the cooled coconut.
- Add the butter and mix with a pastry blender, a fork, or your fingers until thoroughly combined. The mixture will be crumbly but should hold together when pinched.
- Transfer the mixture to a 9-inch round pie plate or tart pan with a removable bottom. Press the crust firmly and evenly into the bottom and up the sides of the pan. Use a measuring cup, a spoon, or your fingers to press the crust into the pan.
- Bake 15 to 18 minutes, or until the crust is golden brown. Set aside to cool completely.
To make the filling:
- Place the chocolate in a small saucepan. Melt over medium heat, stirring until smooth.
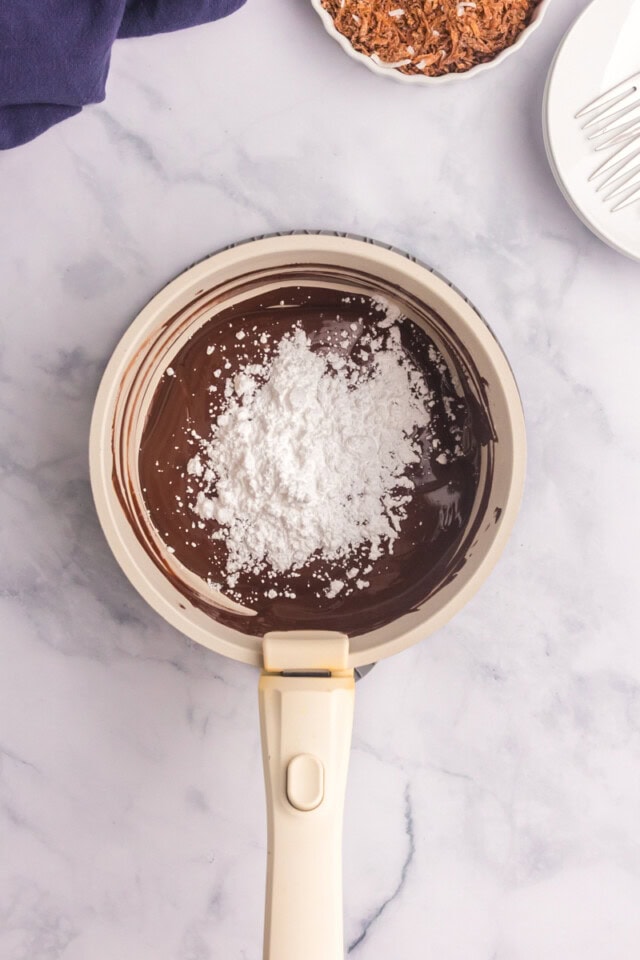
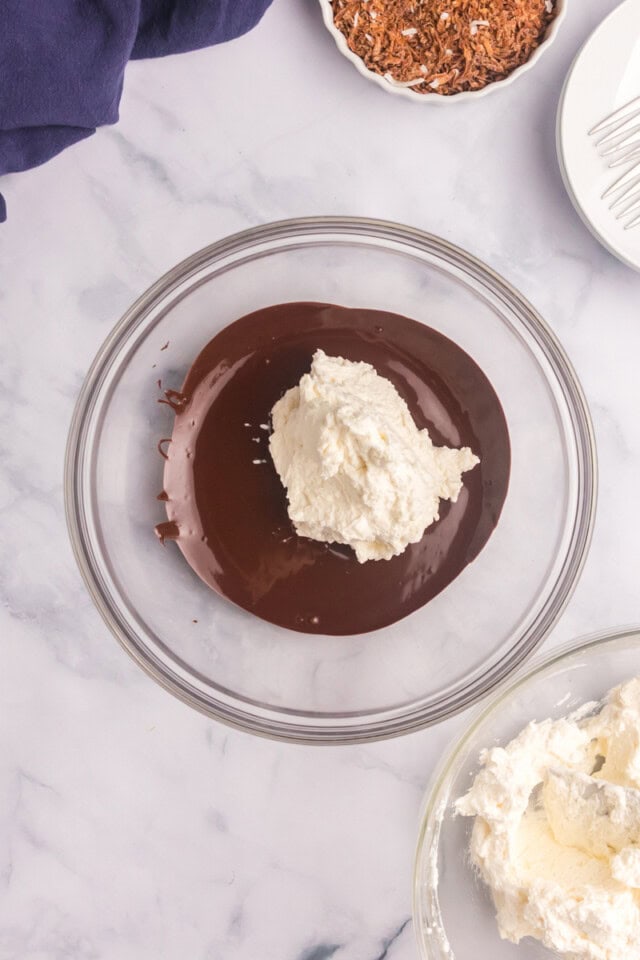
- Remove from the heat and stir in the confectioners' sugar and vanilla. Transfer the mixture to a large mixing bowl. Allow to sit for 5-10 minutes.
- Using an electric mixer with a whisk attachment, whip the cream in a separate bowl until soft peaks form.
- Add about 1/4 of the whipped cream to the chocolate mixture. Stir until combined. Gently fold in the remaining whipped cream.
- Spread the mousse evenly in the cooled crust. Top with more toasted coconut, if desired.
- Cover and refrigerate at least 2 hours before serving.
Video
Notes
- Chocolate choice: Use a good-quality dark chocolate you enjoy eating on its own. Chocolate in the 60–70% cacao range gives the mousse rich flavor without being overly sweet or bitter.
- Whipped cream texture: For the lightest mousse, whip the cream to soft peaks. Over-whipped cream can make the filling dense or grainy.
- Cooling the chocolate: Let the melted chocolate cool slightly before folding in the whipped cream. If it’s too warm, it can deflate the mousse.
- Crust options: While this recipe is written for a toasted coconut shortbread crust, the mousse works well with vanilla wafer, chocolate cookie, or graham cracker crusts. Use a standard 9-inch crust.
- Pan options: This mousse can be made in a pie plate or a tart pan with a removable bottom. Chill until fully set before removing from a tart pan.
- Make-ahead & storage: The pie can be made a day in advance and stored in the refrigerator. For longer storage, freeze the fully set pie and thaw overnight in the refrigerator before serving.


9 Comments on “Chocolate Mousse Pie”
This pie looks absolutely gorgeous! So delicious! I love the combination of coconut and chocolate. YUM!
Looks amazing. ..once my summer holiday is over, I am bookmarking this as a recipe to come back and make.
Thank you so much for printing a recipe that the growing gluten-free population can easily adapt and enjoy!
My health insists on gluten free! Not that through the years I haven’t enjoyed your recipes! I think you might ,like me, enjoy the recipe as much as the actual making and eating! Here’s a real challenge: adapt some of your wonderful recipes to using a specific gluten-free flour blend on the market today. It would take a lot of testing and probably a lot of throwing out but would be valued by many! Many gluten-free people only need that one change in the flour. The other ingredients would stay the same except for perhaps adding xanthan gum. Believe me, this is a challenge!!!
I’d love to do that, Shelby, but I just don’t have the time to devote to it. Maybe someday when it’s not just me doing all the recipe testing!
Damn! I may just make the chocolate mousse part for now!
I’m confused about the chocolate. The recipe calls for 1 cup. Is that after melted? How many oz before melted? I want to make this but not sure how to proceed.
Hi, Leisa! It’s 1 cup that is then melted as directed in the recipe. If you’re measuring by weight, that’s 170 grams, or 6 ounces.
Huge thanks for the super quick reply. I made it but chocolate seized on me. Not sure what happened but there is no mistaking when that happens is there. Hahaa. I will try again tomorrow. Thanks.
Oh, no! That usually happens to me when I try to go too fast. Try melting it at slightly lower than medium heat.